Blue/silver rollerball pen

Signed-In Members Don't See This Ad
See more from Texatdurango

Texatdurango

Member
Joined
Apr 23, 2007
Messages
4,649
Location
Show Low, Arizona
I hadn't made a pen in a long while but a week ago I got my shop kinda, sorta, semi-functional so decided to make a pen real quick to take down to Phoenix and show a few folks at the wood turners show.

This is a pen utilizing the new (to me) Schmidt rollerball nib that is fed from either a converter or cartridge refill.

I made the blank and front section from alumilite and PearlEx. The lower accent ring and upper double accent bands are sterling silver.

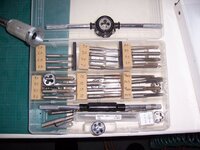
As a point of reference, this is the type of simple but nice pen that can be made using the new multi-start tap and die being offered by Turbowagon in the group buy section.
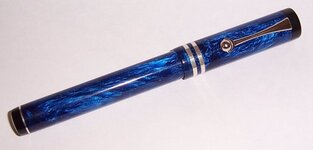
Pen Capped.
attachment.php


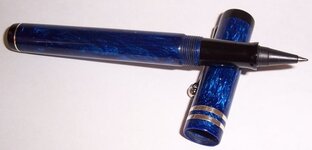
Pen opened showing rollerball nib which threads down into the front section. Lower body threads are triple multi-start.
attachment.php


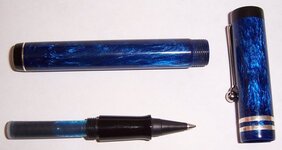
Front section opened showing fountain cartridge. You can see my favorite Private Reserve color ink!
attachment.php
 

Attachments

  • blue-roller1.jpg
    blue-roller1.jpg
    24.6 KB · Views: 683
  • blue-roller2.jpg
    blue-roller2.jpg
    23.3 KB · Views: 698
  • blue-roller3.jpg
    blue-roller3.jpg
    32.7 KB · Views: 689
Signed-In Members Don't See This Ad

PenMan1

Member
Joined
Jul 8, 2009
Messages
6,380
Location
Eatonton, Georgia
Nice job, as usual, George.

I'm glad to see that you are turning again. That must mean that all the boxes are unpacked and the shop set up? Ah, what a great feeling!
 

Texatdurango

Member
Joined
Apr 23, 2007
Messages
4,649
Location
Show Low, Arizona
Nice job, as usual, George.

I'm glad to see that you are turning again. That must mean that all the boxes are unpacked and the shop set up? Ah, what a great feeling!

You don't know HOW GOOD IT IS! :biggrin:

Actually, my shop is full of cabinets I am making for my wifes sewing room, I just stole some time to make a pen! There is PLENTY of stuff still in boxes but the fun has begun again!
 

MarkD

Member
Joined
Jan 24, 2011
Messages
2,293
Location
Sayre, PA
Very nice looking pen! I want to be able to do that! :)

Oviously, you added the threads where the two parts connect. Did you also use these threads to attach the finial and the other end cap?
 

Texatdurango

Member
Joined
Apr 23, 2007
Messages
4,649
Location
Show Low, Arizona
Very nice looking pen! I want to be able to do that! :)

Oviously, you added the threads where the two parts connect. Did you also use these threads to attach the finial and the other end cap?

No, the multi-start 12mm threads are too large for anything but the main cap and body. I used four different threads on this pen.......

1. multi-start for cap/lower body
2. Upper finial screws on using 9mm threads
3. The front section screws into lower body using 9mm threads
4. The nib screws into the front section using 6mm threads.

The lower finial is glued in place.
 

TomW

Member
Joined
Mar 23, 2009
Messages
1,436
Location
Allen, Texas
Very nice looking pen! I want to be able to do that! :)

Oviously, you added the threads where the two parts connect. Did you also use these threads to attach the finial and the other end cap?

No, the multi-start 12mm threads are too large for anything but the main cap and body. I used four different threads on this pen.......

1. multi-start for cap/lower body
2. Upper finial screws on using 9mm threads
3. The front section screws into lower body using 9mm threads
4. The nib screws into the front section using 6mm threads.

The lower finial is glued in place.

That's the difference in you and me, George... I made a prototype pen (using clear rods as you suggested), but I have no idea what size all the threads are.... nor can I find the taps and dies in the shop....
 

Texatdurango

Member
Joined
Apr 23, 2007
Messages
4,649
Location
Show Low, Arizona
.......That's the difference in you and me, George... I made a prototype pen (using clear rods as you suggested), but I have no idea what size all the threads are.... nor can I find the taps and dies in the shop....

The difference is that I have made dozens and dozens of pens using these taps and I can almost do them in my sleep! :biggrin:

When I started using a lot of different taps and dies, I missplaced a tap or two myself but soon learned that putting all my "Pen making" taps and dies in one of those plastic divider trays has really paid off.

Now that they are all neatly organized I find myself cutting more and more threads on the metal lathe so don't use the organized tray as much.... but at least I know where they're at. :wink:
 

wood-of-1kind

Member
Joined
Jul 10, 2005
Messages
4,114
Location
Toronto, ON, Canada
George, are you saying that with Turbowagon's tap/die, we can make a pen similar to that which you are showing? Or, do you require more taps/dies than the basic that are offered in the Group Buy?

By the way, that is agreat looking pen that you are sharing with us. Love your work.
 

soligen

Member
Joined
May 11, 2010
Messages
1,085
Location
Sterling Heights, Michigan
George

Nice Pen!! do you mind answering a few questions about the inside of the cap? I'm wodering:

Did you use any kind of tube inside, or anything to reinforce the segments?

If there is no tube, did you do anything to keep the threads in the cap from showing through?

Thanks!!
 

Russianwolf

Member
Joined
Jul 13, 2007
Messages
5,690
Location
Martinsburg, WV, USA.
George, are you saying that with Turbowagon's tap/die, we can make a pen similar to that which you are showing? Or, do you require more taps/dies than the basic that are offered in the Group Buy?

By the way, that is agreat looking pen that you are sharing with us. Love your work.

Peter, you will need some others, but they are single starts and widely available.

When this all began the use of the front section from one of the larger kits (that was available separately) was popular, so you needed a M10x1 tap I think it is. Can be had for about $5.
 

wood-of-1kind

Member
Joined
Jul 10, 2005
Messages
4,114
Location
Toronto, ON, Canada
George, are you saying that with Turbowagon's tap/die, we can make a pen similar to that which you are showing? Or, do you require more taps/dies than the basic that are offered in the Group Buy?

By the way, that is agreat looking pen that you are sharing with us. Love your work.

Peter, you will need some others, but they are single starts and widely available.

When this all began the use of the front section from one of the larger kits (that was available separately) was popular, so you needed a M10x1 tap I think it is. Can be had for about $5.

Mike, thank you for the response. All this is so new to me that I don't know if I want to "expand" on this aspect of pen making without adding more expen$e$ along the way.
 
Last edited:

Russianwolf

Member
Joined
Jul 13, 2007
Messages
5,690
Location
Martinsburg, WV, USA.
George, are you saying that with Turbowagon's tap/die, we can make a pen similar to that which you are showing? Or, do you require more taps/dies than the basic that are offered in the Group Buy?

By the way, that is agreat looking pen that you are sharing with us. Love your work.

Peter, you will need some others, but they are single starts and widely available.

When this all began the use of the front section from one of the larger kits (that was available separately) was popular, so you needed a M10x1 tap I think it is. Can be had for about $5.

Mike, thank you for the response. All this is so new to me that I don't know if I want to "expand" on this aspect of pen making without adding more expen$e$ along the way.

I have two sets of Taps and Dies in the shop (ASE and Metric) and other than the M10x1 which I bought separately I think I'm in for $50 on tooling so far. The big expense is the multistarts. The Die holder to make everything easier is about $30 if memory serves. and a Jacobs chuck is all you need to keep the taps simple.
 

Texatdurango

Member
Joined
Apr 23, 2007
Messages
4,649
Location
Show Low, Arizona
George, are you saying that with Turbowagon's tap/die, we can make a pen similar to that which you are showing? Or, do you require more taps/dies than the basic that are offered in the Group Buy?

By the way, that is agreat looking pen that you are sharing with us. Love your work.

To be clear, you don't have to buy the tap and die in Turbowagons group buy, you can use any single start tap and die out there. I just like using the triple multi-start threads for several reasons. I'm just showing what a pen will wind up looking like with the triple multi-start threads on it.

As I stated, I used four different threads in making this pen. Could I have used fewer... yes, but I chose to make the pen this way. After LOTS of trial and error, I have settled in on my favorite threads for certain things and to me, it's easier to just cut some threads than glue two parts together.

As an example, I have a favorite way of installing the clip in which I thread the finial so it easily comes off in case the clip ever breaks. Some just glue the finial on so no need for a tap and die then.

I went down and took a shot of my tap and die box to give you an idea of what I use. Without going into a lot of boring detail, before using my metal lathe more and more for threading, I was regularly using only five or six of these taps and dies.

I found that going out and buying a huge set of taps and dies was a total waste of money since most of my "regulars" are not included in the sets! Some have gone to great lengths to persuade others to buy sets so I will not try to dissuade anyone not to, it's a pointless argument so buy what you feel comfortable with.

Since cost is a concern to some, I would say that aside from the multi-start tap and die, you could get all the other taps and dies you would ever need to make nice pens and a mt-2 die holder for well under $100. At Victor Tools ( http://www.victornet.com/ ) all the oddball sizes usually not included in the sets can be be found, usually for $4 or $5 apiece.

Remember, I bought these thinking I'll have a nice selection if needed but some have yet to be used and some only once or twice.
attachment.php
 

Attachments

  • tap tray.jpg
    tap tray.jpg
    65.9 KB · Views: 327
Last edited:

Texatdurango

Member
Joined
Apr 23, 2007
Messages
4,649
Location
Show Low, Arizona
George

Nice Pen!! do you mind answering a few questions about the inside of the cap? I'm wodering:

Did you use any kind of tube inside, or anything to reinforce the segments?

If there is no tube, did you do anything to keep the threads in the cap from showing through?

Thanks!!

Tubes......... we don't need no stinking tubes! :biggrin:

There are no tubes in the pen since I don't need them for anything. There are no segments either. I think what you might be referring to are the silver bands which are not segments but are solid bands swedged into shallow grooves in the cap.

The blank I made is solid enough that the threads do not show through.
 

skiprat

Passed Away Mar 22, 2022
In Memoriam
Joined
Oct 19, 2006
Messages
7,812
Location
In a Skip in Wales
Nice to see that you haven't lost your touch George.:biggrin: I love the blue/silver/black combo.

I think you are also being a bit too modest by suggesting that 'You Too Can Make This Pen' just because we might buy some taps and dies:wink:
You have to admit that a bit of talent, skill and flair comes in useful too:tongue:
 

Texatdurango

Member
Joined
Apr 23, 2007
Messages
4,649
Location
Show Low, Arizona
Nice to see that you haven't lost your touch George.:biggrin: I love the blue/silver/black combo.

I think you are also being a bit too modest by suggesting that 'You Too Can Make This Pen' just because we might buy some taps and dies:wink:
You have to admit that a bit of talent, skill and flair comes in useful too:tongue:

OK, so some talent is involved, actually a lot! :biggrin: My point is that making a "kitless" pen in many ways is easier than making a kit pen where you have to worry about mandrels, bushings, gluing in tubes, pressing parts together, cracking blanks, gluing blanks to bushings and on and on.

Speaking of the colors and keeping in mind I sorta threw this together rather quickly.... I am having mixed thoughts as to how the pen would look best.

Part of me likes it the way it is, part of me wants to "balance" the pen by adding a silver ring just below the cap finial just as the lower finial is seperated by a silver ring. Whatcha think?
 

turbowagon

Member
Joined
Sep 2, 2009
Messages
1,067
Location
Tucson, AZ
I think the pen looks great as-is.

Are the silver bands strips that you wrap around the barrel? If so, how obvious is the seam?
 

TomW

Member
Joined
Mar 23, 2009
Messages
1,436
Location
Allen, Texas
Nice to see that you haven't lost your touch George.:biggrin: I love the blue/silver/black combo.

I think you are also being a bit too modest by suggesting that 'You Too Can Make This Pen' just because we might buy some taps and dies:wink:
You have to admit that a bit of talent, skill and flair comes in useful too:tongue:

OK, so some talent is involved, actually a lot! :biggrin: My point is that making a "kitless" pen in many ways is easier than making a kit pen where you have to worry about mandrels, bushings, gluing in tubes, pressing parts together, cracking blanks, gluing blanks to bushings and on and on.

Speaking of the colors and keeping in mind I sorta threw this together rather quickly.... I am having mixed thoughts as to how the pen would look best.

Part of me likes it the way it is, part of me wants to "balance" the pen by adding a silver ring just below the cap finial just as the lower finial is seperated by a silver ring. Whatcha think?

My impression was that the upper sliver band was missing...

Was the swaging procsess trial and error, or did you just swage the band then turn off what was left?
 

wood-of-1kind

Member
Joined
Jul 10, 2005
Messages
4,114
Location
Toronto, ON, Canada
Nice to see that you haven't lost your touch George.:biggrin: I love the blue/silver/black combo.

I think you are also being a bit too modest by suggesting that 'You Too Can Make This Pen' just because we might buy some taps and dies:wink:
You have to admit that a bit of talent, skill and flair comes in useful too:tongue:

OK, so some talent is involved, actually a lot! :biggrin: My point is that making a "kitless" pen in many ways is easier than making a kit pen where you have to worry about mandrels, bushings, gluing in tubes, pressing parts together, cracking blanks, gluing blanks to bushings and on and on.

Speaking of the colors and keeping in mind I sorta threw this together rather quickly.... I am having mixed thoughts as to how the pen would look best.

Part of me likes it the way it is, part of me wants to "balance" the pen by adding a silver ring just below the cap finial just as the lower finial is seperated by a silver ring. Whatcha think?

Let me "relief" you of your pain George and just send me your creation as "is":wink: Personally I would not change a thing about it. It's a winner just the way you 'gotsit'.
 
Top Bottom