
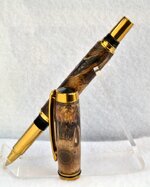
..from down under. Thanks George, nice blanks! I received the blanks ( 7)
about a week or so ago and have been taking my time as they seem to be, and they are somewhat fragile. I did tape the blanks after cutting to length with a bit extra. I also glued a small section of acrylic to the ends to stop any drilling blowouts! Before glueing in the tubes I used thin CA and sloshed the blank's interior, let that sit overnight and then glued the tubes into the blanks. Turning was a bit tedious. Even with very light cuts I could only make 3 passes before resealing the outer surface w/thin CA to help keep it together. The hairy fibers had been exposed! I used this process 5 times to get the blanks to size. I still dealt with 2 blowouts. One was a 1 piece section and the other was a 4 or 5 piece explosion. I found and replaced the parts and also mixed a slurry to fill a few small voids. All in all I like the Banksia blanks, just not the stress of turning them. Think "Scary Sharp Tooling!" Hope you like the results on this Gent Junior. Be well .......Jan
about a week or so ago and have been taking my time as they seem to be, and they are somewhat fragile. I did tape the blanks after cutting to length with a bit extra. I also glued a small section of acrylic to the ends to stop any drilling blowouts! Before glueing in the tubes I used thin CA and sloshed the blank's interior, let that sit overnight and then glued the tubes into the blanks. Turning was a bit tedious. Even with very light cuts I could only make 3 passes before resealing the outer surface w/thin CA to help keep it together. The hairy fibers had been exposed! I used this process 5 times to get the blanks to size. I still dealt with 2 blowouts. One was a 1 piece section and the other was a 4 or 5 piece explosion. I found and replaced the parts and also mixed a slurry to fill a few small voids. All in all I like the Banksia blanks, just not the stress of turning them. Think "Scary Sharp Tooling!" Hope you like the results on this Gent Junior. Be well .......Jan
") .
.