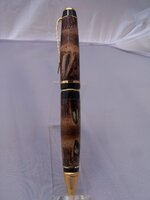
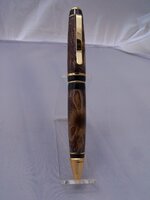
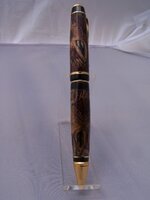
Finished this one yesterday as well, but had a lot more drama.
Because this came from George before he had his stabilising gear it was still a bit soft in the centre. I used lots of thin CA but obviously not enough, or too much, because when I took the bush out of the top section of the bottom part a piece of banksia came off as well. I was going to toss it but decided to cut the broken piece out and fit a bit of ebony in its place I could match up with the top.
I think it worked pretty well and am really happy with the end result.
Your input would be appreciated and welcome.
Thanks for looking.
Bob.
")
Oh boy, oh boy Bob, you didn't follow my advice on soaking the drilled hole first, before the brass tube is glued, huh...!!!
In fact Bob, none of the Banksia Pod Resifills aren't stabilised even today, apart from some knife handle blanks that I made recently to send to Russia, knife blanks has to have the material stabilised...!
Believe it or not, this last couple of months I have had orders for these blanks from every corner of the Earth, and in lots of 10 and that cleaned me up very fast so I decided to make 120 in one long marathon and have enough done for a little while.
The one thing that I don't like is to list the Resifills (particularly these blanks) unless they are 1 month old, the resin requires 14 days to cure properly and I like to give then the extra 2 weeks just to be safe so, making and letting them go, I dislike and advise those that order fresh ones to make sure they understand the importance of the 3 to 4 weeks waiting time from making...!
The problem that I'm confronted with is that, many of the people ordering these, don't have much or any experience with turning a blend of different materials in one blank and, not always willing to listen what I have to say you follow any of my suggestion and or links to where related info is.
The results are what you would expect, failure and then, they decided that they don't won't the blanks anymore and what their money back. Most of them are not prepared to admit/accept that, they don't have the skills and the right tools to handle such type of blanks and as soon as they make their mind, nothing else matters and that, doesn't really work with me...!
Now, is the very nature of these Banksia hairy pods that make the final results so spectacular however, its the very nature of some parts of this pod that makes the blanks so fragile and not so easy to handle. I have demonstrated in my tutorial that, is the nature of the red velvet material of this pod that is creating the difficulties, this velvet is liquid repellent and therefore doesn't allow much to stick to it.
Resin doesn't touch it so, the only way to maintain the blank in one piece is to follow my steps, one by one. Despite the blank being hard from being encapsulated with resin under 100 PSI pressure, those small layers of the red velvet material, are kept very compressed from the pressure exerted on the pot and for a overnight sleep, as soon as the hard resin or the hardened seeds and pod body are disturbed/cut, the soft red velvet appears and will try to separate from the rest of the pod so, that way I always said that, is of most importance that, as the blanks is turned (couple of mm at the time), the exposed red velvet stuff is immediately soaked with CA (5 cup viscosity, preferentially), that super thin CA is the only think that soaks to the red velvet but only to a certain depth (2 or 3 mm).
When that red velvet is harden with the CA, the blank is ready for the next run (material removing). The reason why is so important that the drilled hole is soaked/saturated with the thin CA is because, when the drill cuts through the pod, that soft red velvet is exposed and can wrap around the drill bit, causing the blank to shatter from the inside out, many time not visible to the naked eye so, a strong tape wrapped around the blank prior to drilling, is a must.
The best practice would be to drill 5mm deep and soak with CA, cut another bit and soak however, all the blanks I drilled myself seem to behave OK so, I do the major soaking to the drilled hole after the hole is made. Those 2 or so mm that the thin CA is capable to penetrate on the red velvet, will be the only thing that will be holding the blanks together when reaching the pen correct diameter/size, if that red velvet has not been harden from the inside out, the chances are that, a chunk will be ripped off at the last minute or, become attached to the bushings and brake apart at the joint with the un-harden red velvet layer...!
Now, the obvious question is, why don't I stabilised the pods before casting...???
The answer is, the Cactus Juice is unable to soak and harden that red velvet material, well to be more precise, many other parts of this pod doesn't harden however, I have found that, if the pod is stabilised prior to casting, there is an improvement to the workability of these blanks to up to 50% but, thin CA is still require to replace what the Juice couldn't do.
Last year I decided to make 2 batches, one with raw pods and the other with stabilised pods, the price difference was the $1.50 extra, that cost's me to stabilise each blank. Both batches listed in my eBay store and explaining the differences, of 24 blanks each batch, I had the raw pods sold and only 1 sold of the stabilised ones.
I left the stabilised blanks listed and did not list any of the raw pod ones just to see what would happen and the result was that, despite of the 50% (modest evaluation) I promised, everyone wanted the raw pods with the "excuse" that, they could do with thin CA, what the Juice did do, for less than $1.50...!
They were ordering to me made, blanks with the raw pods and the stabilised ones took the whole year to sell the 10 so, simply stop trying to convince people that, the blanks with the stabilised pods where a much better option, particularly for novices...!
The only way I have to stop people from complaining, and making me responsible of being selling "bad blanks/not done right, etc...!" would be to stop making them all together and quite honestly, if it wasn't for the fact that my 2 Banksia trees produced so many pods, these last 5 years (not much will come out of them for the next 2 or 3 years due to a heavy trimming I gave them...!) and I don't like to waste natural resources, I would stop and not bother about it, the little money I make from the price I sell them, is not worth the drama however, I'm not going to, at least until I run out of the multiple large bags I have of the pods stored, I may re-consider, then but for know, I sell whatever I have make of the raw pods (about 80 or so still left), after that, I will stabilised every pod and make them only with the stabilised pods and priced to cover the stabilisation, no other options or opening exceptions to anyone, is either stabilised pods, or no blanks at all, that should take care of most of the problem...!:wink::biggrin:
I'm excited about seeing a couple of knifes done with the #45xx stabilised pods that this Russian guy has purchased, they were posted only 6 days ago so, a few more weeks before I see the results, yeah...!:wink:
PS: I hope people take the time to read this post and think a little on what I said, it may help many of you...!
Cheers
George