Aquapearl Executive Lemonade

Signed-In Members Don't See This Ad
See more from Yankee Remedy

Yankee Remedy

Member
Joined
Feb 20, 2018
Messages
42
Location
Winsted CT
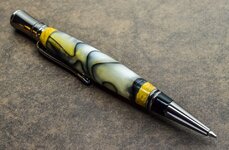
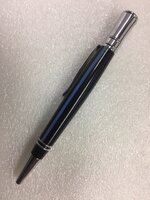
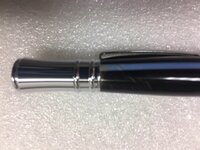
I botched the drilling process probably because I was in such a hurry to use my new drill press instead of using the collet attachment on my lathe. That would have saved me all kinds of problems. The Spalted Pearl or Aquapearl blank was a cylindrical piece that would have fit perfectly in my 3/4 inch collet.

So I cut off 1/4 inch on both sides of the blank then used some stabilized elder burl I had leftover from another project.

As the saying goes "When life gives you lemons, make lemonade"

Thanks to Mal of Magpens suggestions I was able to get a nice finish using the Novus scratch remover and polish. Thanks for the help Mal!

Mark James also suggested I try something like the Executive style pen. Thanks Mark!

Gary
 

Attachments

  • aquapearl-pen-1.jpg
    aquapearl-pen-1.jpg
    231.8 KB · Views: 295
  • aquapearl-pen-7.jpg
    aquapearl-pen-7.jpg
    198.2 KB · Views: 238
  • aquapearl-pen-5.jpg
    aquapearl-pen-5.jpg
    203.9 KB · Views: 222
  • aquapearl-pen-2.jpg
    aquapearl-pen-2.jpg
    207.4 KB · Views: 229
  • aquapearl-pen-4.jpg
    aquapearl-pen-4.jpg
    186.2 KB · Views: 193
Signed-In Members Don't See This Ad

magpens

Member
Joined
Feb 2, 2011
Messages
15,912
Location
Canada
I think you did quite a nice job on that pen.

I am not a fan of the Executive, and I think your pen shows why ... the material ends up too thin particularly near the ends ... and I think we can see the brass tube showing through with that semi-translucent blank.

At first I thought that the blank had some yellow in it and I was going to say that your choice of (perhaps dyed) box elder for the ends was a good match .... but I can say that anyway .... it is !

Painting the inside of the drilled hole in the blank would be strongly advised in future.

Thanks, Gary, for your remark.
 
Last edited:

Yankee Remedy

Member
Joined
Feb 20, 2018
Messages
42
Location
Winsted CT
Good Advice!

Thanks for the good advice Mal. The next time I make one of these pens I will do as you suggest and paint the inside of the blank. The finish came out so nice using that Novus scratch remover and polish I didn't really need the CA glue to finish it. I did put on a few coats just for protection.

Thanks for the helpful advice! Gary
 

Timber Ripper

Member
Joined
Dec 28, 2017
Messages
374
Location
Burlington, NJ
I too botched the drilling of an acrylic blank.. The bit caught and bound at the very end resulting in deep internal gouges. Because the blank did not shatter or split, I didn't realize it until it was turned down very thin to fit the executive pen kit. It buffed up fine.. No external scratches but can see the internal gouges and the brass tube at its thinnest edge.
I have four more to do to complete an order. What I will do differently on the next 4 is, I will cut the blank 1/4 longer than needed so I don't have to drill completely through. Than cut to size after drilling. Also, because this kit requires to turn so thin, I will take Mal's advice as suggest to Gary to paint the inside of the blank.

Live and learn..
 

Attachments

  • Exec-BlueLine.jpg
    Exec-BlueLine.jpg
    81.5 KB · Views: 192
  • Exec-BlueLine1.jpg
    Exec-BlueLine1.jpg
    51.7 KB · Views: 166

magpens

Member
Joined
Feb 2, 2011
Messages
15,912
Location
Canada
The finish came out so nice using that Novus scratch remover and polish I didn't really need the CA glue to finish it. I did put on a few coats just for protection.

You don't really need to put CA on top of acrylic in most cases. In fact, it often causes problems because you usually need to sand CA to get smooth for polishing ... during the sanding you can sand through to the acrylic and you can even get a peel-off at that point. . I almost never put CA on acrylic unless there is a specific reason to do so, like filling a small surface void (bubble).

I just use Mequiar's coarse, Novus 3, Novus 2, and then Mequiar's Plastix.
Sometimes even leave out the first or the last depending on what things look like and what I like at the time.
 

Yankee Remedy

Member
Joined
Feb 20, 2018
Messages
42
Location
Winsted CT
Still a Nice Looking Pen

I think I like your blank with the subtle graduation towards the center better than the way I did it. Mine is much more pronounced, but it would have shown even more of the brass tube if I did do it that way. I was also thinking that it might be better to use colored epoxy rather than paint for the inside of the drilled hole or the brass tube.

Those cylindrical blanks slip in the vice and you really can't keep tightening it because once you drill through to where you are holding the blank it starts to collapse an could possibly make a real mess.

That's probably a good idea giving yourself a little extra to play with.

Gary
 

Yankee Remedy

Member
Joined
Feb 20, 2018
Messages
42
Location
Winsted CT
That's Good to Know!

You don't really need to put CA on top of acrylic in most cases.

I was seriously considering leaving it without the CA glue, but I always see them finish their pens with CA.

It's usually a pain in the butt, and I would prefer not using it if I can get away with it.

Thanks for your input Mal!
Gary
 

Timber Ripper

Member
Joined
Dec 28, 2017
Messages
374
Location
Burlington, NJ
Those cylindrical blanks slip in the vice and you really can't keep tightening it because once you drill through to where you are holding the blank it starts to collapse an could possibly make a real mess.

Gary

Gary,
To dramatically limit the amount of slippage of the cylindrical blanks. I've wrapped a small piece of the non slip toolbox drawer liner. Works wonders without having to crush your blank.
 

Attachments

  • non slip drawer mat.JPG
    non slip drawer mat.JPG
    24.1 KB · Views: 123

magpens

Member
Joined
Feb 2, 2011
Messages
15,912
Location
Canada
I was also thinking that it might be better to use colored epoxy rather than paint for the inside of the drilled hole or the brass tube.
I don't like coloring the epoxy because adding that to the epoxy lengthens its set and cure times and I like my tube-gluing epoxy to set up quite fast ... I use 5-minute and can start turning in another 10 minutes or less. So I prefer to paint the inside of the hole.
 

magpens

Member
Joined
Feb 2, 2011
Messages
15,912
Location
Canada
Are you talking about drilling with a drill press and vise ?

I do all my blank drilling on the lathe and find that it is much more accurate and goes both better and faster.

Slippage of your blank can be a problem, but I don't see how you can do what you suggest and maintain drilling accuracy (which for me is very important).

Also, if you are worried about crushing your workpiece by tightening to prevent slippage, what you can do, if you have the right headstock chuck, is drill half way, and then leave that drill in, reverse the workpiece in the chuck, and then, with a second identical drill, go in from the opposite end. You have to be careful when the two drills meet, but you can take out one and go very gently with the other.


Those cylindrical blanks slip in the vice and you really can't keep tightening it because once you drill through to where you are holding the blank it starts to collapse an could possibly make a real mess.

Gary

Gary,
To dramatically limit the amount of slippage of the cylindrical blanks. I've wrapped a small piece of the non slip toolbox drawer liner. Works wonders without having to crush your blank.
 
Last edited:

Yankee Remedy

Member
Joined
Feb 20, 2018
Messages
42
Location
Winsted CT
Best Way to Hold a Cylindrical Piece

I think the best way to hold a cylindrical piece is to use the collet attachment on the lathe. You can get them cheap on Ebay. I just wanted to try out my new drill press. Which was a mistake!

I recently made a clear casting with Alumilite Water Clear and through my research I found out that latex paint will react with the resin so I used hobbie paint instead. The end result was disappointing because the eye sockets of the scull (of a rabbit) was the only place where there was no reaction and it was the only place I used colored epoxy. I colored the epoxy by scraping a colored chalk and mixing it in. They sell colored chalk at craft stores.

It is good to swap ideas. I guess these are the problems we all have to contend with and we all have a different approach.

I'm sure there will come a time I will use all of these suggestions, and I really appreciate the helpful input!
Gary
 

magpens

Member
Joined
Feb 2, 2011
Messages
15,912
Location
Canada
You will find that drilling on the lathe is so much more accurate and a whole lot easier.

I use a metal working lathe which, of course, has a headstock with a through hole (including the MT3 taper in this case). And I use a 4-jaw chuck which is so much more convenient than a 3 jaw (the metal-working "kinda standard").

All wood lathe chucks that I have seen are 4-jaw .... but different of course.

Before doing any drilling, I turn my blank round by mounting it between centers. Then when it is round, the chuck jaws hold it accurately and you can easily drill it.

The beauty of the 4-jaw, for me, is that I don't have to turn the smaller cross-section blanks totally round .... just turn off the corners a fair bit, leaving 4 flats on the blank as well as the rounded corners. The rounded corners have to have a big enough area so that you can tighten the chuck jaws up onto the rounded parts and the blank can then be drilled accurately down the axis of the blank. After drilling you glue in your tubes, and then mount the blank between conical centers and finish the rounding. Everygthing comes out accurately and the strengthening effect of the brass tube prevents crushing of a blank that is smaller in cross-section. Works well for me.

The through hole in the metal lathe headstock is good to let you mount long blanks that can stick through the chuck towards the back side. Of course, the 4-jaw chuck mounted on the head stock has a through hole also (which is usually bigger than the hole of a usually-supplied 3-jaw )

Just my pitch for drilling blanks on the lathe. Not real sure, but I think some wood lathes have a headstock with through hole, and the headstock chuck for a wood lathe is more useful if it does also.
 

magpens

Member
Joined
Feb 2, 2011
Messages
15,912
Location
Canada
I colored the epoxy by scraping a colored chalk and mixing it in. They sell colored chalk at craft stores.
Thanks for this info. I learned something from you on this score.

I guess you can get many colors of chalk at a craft store. . And you can mix chalk dust of different colors to make up any color you like !

Tool stores sell colored chalk dust for chalk lines, but limited in color to only red, blue, white, and black.
So now I know where to get other colors of chalk. Mixing chalk with the epoxy will have less affect on its set time than mixing in paint !
 
Last edited:

Yankee Remedy

Member
Joined
Feb 20, 2018
Messages
42
Location
Winsted CT
Nice to Have a Metal Lathe

I would love to have a metal lathe.

I haven't had my wood lathe for too long, I'm still learning about it. The head stock does have a through hole and I recently made a drawbar for the collet attachment, and it can also be used for the Jacob's Chuck as well. And it's a good idea to use it on both. That way you don't have to worry about them coming loose.

I gotta go I'll talk to you soon.

Gary
 

mark james

IAP Collection, Curator
Joined
Sep 6, 2012
Messages
12,751
Location
Medina, Ohio
I am not a fan of the Executive, and I think your pen shows why ... the material ends up too thin particularly near the ends

Mal is correct that the Executive Kit does have a particularly narrow shoulder.

Bushing to Tube OD:

Executive: .480" - .410" = .070"/2 = .035" for your final "Material" (That's not to bad... :eek:).

Jr Gent II: (Upper Tube): .567" - .483" = .084"/2 = .042" for your final material.

Zen: .512" - .400" = .112"/2 = .055" for your final material.

Berea Sierra: .474" - .410" = .064"/2 = .032" for your final material.

AND I have made many Berea Sierra's with end caps that did not blow out. I do not disagree in any respect with the thought that the end caps are very thin. But... I believe the problem lies in using translucent acrylic (and similar) vs wood (that has been treated/stabilized with a bit of CA). Thin end caps are fine - with non-translucent plastics, or treated woods... but also a challenge :cool: And yes, properly painting the holes is crucial.

I'm just poking ya!!! (Guess I like itty bitty stuff!) Have fun.
 

magpens

Member
Joined
Feb 2, 2011
Messages
15,912
Location
Canada
Useful info, Mark.

In the case of the Berea Sierra: .474" - .410" = .064"/2 = .032" for your final material.

I cannot understand why they designed this way.
There is plenty of room inside to make this wall thickness greater.
As I see it, the problem must have begun with the first Sierra twists and never got addressed.
The twist mechanism in that kit is unnecessarily bulky (large diameter), and a redesign would solve the problem ..
There is really no need for a tube diameter of 27/64" nominal.
Maybe at the time of the original design there was such a need.
But not now ... look at the Majestic Squire, for example, with brass tube of 3/8" nominal and let's say 0.370" actual (don't have one to measure)

........ Majestic Squire: .495" - .370" = .125"/2 = 0.0625" for final material ..... to follow Mark's format

That's a big improvement in this regard over any of the above.
I even am confident it could be improved by a few thou. more.
So why hasn't the actual Berea Sierra Twist (which many copy ) been redesigned to overcome the end-material-thinness problem ?

That's the biggest problem with that kit, IMHO.
 
Last edited:

Yankee Remedy

Member
Joined
Feb 20, 2018
Messages
42
Location
Winsted CT
Pen Design

My first unsuccessful attempt at pen making was a Rockler Manhattan pen. I would guess the bushing to tube O.D. was about .015. At least that's what it looked like once I finished it. When you pull the pen apart you can see that it was literally paper thin.

I was considering the Sierra for my next pen project, but now that I see how thin they are at the shoulder maybe I'll play it safe and go with the Majestic Squire or the Zen.

Thanks again for your input.
 

magpens

Member
Joined
Feb 2, 2011
Messages
15,912
Location
Canada
Gary ... on behalf of all of us .... you're welcome. I think this may be an enlightening thread for more folks than just you !!
 
Top Bottom