Another "Shiny Thingy"

Signed-In Members Don't See This Ad
See more from wizard

wizard

Member
Joined
Aug 27, 2009
Messages
3,569
Location
Houston, Texas
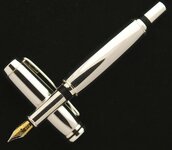
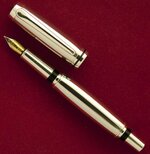
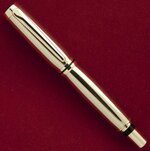
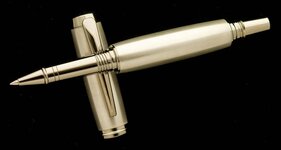
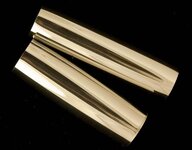
Made it this A.M. It's Aluminum on a Sterling Silver Navigator Fountain Pen. The aluminum blanks are from John Goodin AKA johnnycnc. Turned with carbide tools. Made this as a custom gift for my brother, a dentist, who wanted another version of a pen I previously made like this one.
To prevent fingerprints, I would have normally airbrushed it with aluminum oxide to get a matte finish. However, he wanted it "shiny". So to prevent fingerprints, I went ahead and put a VHT clear coat finish from Caswell Electroplating on the pen. I tried different color surfaces to take pictures on and went ahead and included both in the post. Hope you like it. Had fun making it and when finished it just looked like another "shiny thingy" to me. Comments welcome but most of all thank you for looking. Doc:)
 

Attachments

  • Aluminum Navigator Fountain Pen_2.jpg
    Aluminum Navigator Fountain Pen_2.jpg
    29.2 KB · Views: 435
  • Aluminum Navigator Fountain Pen_1.jpg
    Aluminum Navigator Fountain Pen_1.jpg
    43.6 KB · Views: 310
  • Aluminum Navigator Fountain Pen.jpg
    Aluminum Navigator Fountain Pen.jpg
    40.1 KB · Views: 343
Signed-In Members Don't See This Ad

SDB777

Member
Joined
Feb 6, 2010
Messages
6,620
Location
Cabot, Arkansas USA
Liking it a lot!

What did you use to finish(sand or whatever)??


BTW, like it on the red background, easier on the eyes.


Scott (thumbs up to ya) B
 

jskeen

Member
Joined
Oct 11, 2007
Messages
1,754
Location
Crosby, Texas, USA.
Nice work Doc. Just enough contrast between the metals to not have it look boring, but shiny enough to look like it goes together.

I gotta say, on the pics though, the red reflection on the sides vs the black one in the middle (camera lens i'm guessing?) seem to detract from the outlines of the pen. The black is at least uniform across the pen.
 

ctubbs

Member
Joined
Sep 12, 2010
Messages
3,588
Location
Murray, Kentucky
Very well, Doc, you finally messed up. It is obvious that whole pen is nothing other than a "PhotoShop Creation". If human hands had ever been close to that magnificent pen, there would have been a bit of fingerprint on it somewhere and with the quality of your photos, that little bit would show up like the proverbial poop in a punch bowl. There just are no prints on the pen, therefore, logic leads us to believe it is not real.

Seriously Doc, that is one truly gorgeous pen, worthy of its creator. As they say down here, "Doc, ye done good!"
Charles
 

ToddMR

Member
Joined
May 3, 2010
Messages
1,715
Location
Columbus, OH
Well done! I can tell you are spot on the fit too. I think a pen like that being over or under would show very easily. Nice work all around.
 

PenPal

Member
Joined
Nov 29, 2006
Messages
2,708
Location
Canberra, A.C.T., Australia.
Shreenath,

The brother of a pen or the pen of a brother since we are our brothers keeper he will be both impressed with the shiny he loves and the design you provided. Kerosine although messy to use with superfine wet and dry helps acheive a top finish with aluminium. I also will send by E Mail if I have not already another Idea for a pen for your brother.

Celebrate your friendships in the family that is the sacred unit for all of us.

Kind regards Peter. Good to talk to you the other day.
 

Padre

Member
Joined
Dec 2, 2009
Messages
1,841
Hey Doc, what is your secret for getting all of the scratches out? It's a beautiful pen. You do some amazing work.
 

IPD_Mrs

Member
Joined
Jun 27, 2007
Messages
2,048
Location
Zionsville, Indiana
I really like it. I agree on the contrast between metals, and I too like the red better than the black background. I have to squint on the black to keep it from being painful to look at. Excellent job!
 

OKLAHOMAN

Member
Joined
May 17, 2006
Messages
10,228
Location
Costa Rica
Ok, I get to my hotel room, plug in my laptop, connect to the wireless network here open the IAP, then this thread and the glare off of that pen knocked me off the internet 3 times before I saw it really didn't knock me of but blinded me for a second...Great job again Doc.
 
Joined
Jun 28, 2010
Messages
1,830
Location
Pineville, Louisiana
That looks awesome. I have tried to make an aluminum pen but it was a bugger to get the hole drilled and then my carbide chisel just chattered a lot and made a mess of the blank. If I could drill and turn aluminum for a Jr gent, I would make a double closed end. nyhoo I love the way yours looks.
 

Mapster

Member
Joined
May 21, 2010
Messages
505
Location
Orlando, Florida
Beautiful pen. I don't know how you got that to shine like it does, but it is something else! Spectacular. Would you mind sharing your secret to amazing aluminum pens?
 

wizard

Member
Joined
Aug 27, 2009
Messages
3,569
Location
Houston, Texas
Thank you all for the kind words and comments. Several have asked how I finish my aluminum pens.
I actually start the finishing while I'm turning by only using the carbide finishing blade (straight edge) of the tool to turn the blanks to shape. I make very light cuts. I don't use the carbide cutters or gouges to reduce the aluminum as it will be very difficult to smooth later. After turning to shape, I use sandpaper from 120 grit down to 600 grit followed by MM, dry, to 12000 grit. I move the abrasive over the surface rapidly to prevent overheating. After each sanding, I stop the lathe and manually turn/rotate the blanks, clean with a paper towel and look for any imperfections or irregularities by using the reflection of the light over my lathe at an angle. This is the most important step as it will prevent you from having to go back and resand all over again. After getting to 12000 grit, I finish with Brasso Metal Polish and paper towel at low speed followed by high speed. After cleaning the Brasso off with a paper towel while turning, I use a microfiber cloth at high speed to buff the blanks to a mirror like finish. As some of you were curious, when taking pictures of the pens, I wear gloves to prevent fingerprints.:rolleyes:. Please feel free to ask if you have questions. Again thank you for the kind comments. Regards, Doc:)
 

wizard

Member
Joined
Aug 27, 2009
Messages
3,569
Location
Houston, Texas
For any that are curious, I have attached pictures of some "shiny" aluminum tubes when done polishing (pardon the dust and fingerprints) as well as an Aluminum pen I have done previously with a matte finish using an Paasche Airbrush with superfine Aluminum Oxide. Regards, Doc:)
 

Attachments

  • Aluminum on Titanium Jr. Gentleman.jpg
    Aluminum on Titanium Jr. Gentleman.jpg
    21.4 KB · Views: 132
  • Aluminum Jr Gentleman_3.jpg
    Aluminum Jr Gentleman_3.jpg
    38.9 KB · Views: 117
Last edited:

wizard

Member
Joined
Aug 27, 2009
Messages
3,569
Location
Houston, Texas
Hey Doc, what is your secret for getting all of the scratches out? It's a beautiful pen. You do some amazing work.

Chip. Thank you for the compliment. I didn't quote anybody in my response to the question on this thread so I'm not sure it showed up that I responded as a followup.:redface: Any way, I answered the question in the posts above. If you have any other questions, feel free to ask. Doc:)
 

Padre

Member
Joined
Dec 2, 2009
Messages
1,841
Hey Doc, another question. When you say "carbide finishing tool," what exactly does that mean? A woodchuck or something else? Thank you.
 

wizard

Member
Joined
Aug 27, 2009
Messages
3,569
Location
Houston, Texas
Chip,
I used the Easy Wood Tools that have the carbide tips. The two that I use are the Mini Rougher with a Ci2 tip which has a straight edge and you get a smooth removal of the aluminum stock much like a metal lathe. I also use the Mini Finisher with the Ci3 tip which has a circular edge. The finisher is a little trickier for me because it has a tendency to gouge it you apply too much pressure. It does help to shape the pen but the "rougher" actually leaves a smooth surface due to its straight edge. Hope that helps. Feel free to ask if you have any other questions. I have included links to where I got the tools from and description. Regards, Doc

http://www.woodcraft.com/Product/2080216/29202/Ci2-Mini-Rougher.aspx
http://www.woodcraft.com/Product/2080216/29203/Ci3-Mini-Finisher.aspx

The tip of the carbide tool is square with a flat edge and this is the link
http://www.woodcraft.com/Product/2080216/28286/Ci1-Easy-Rougher-Replacement-Square-Cutter.aspx
The square cutter also comes in the mini version for those who have the mini version of the Easy Wood tools.
 
Last edited:
Top Bottom