Another one of my "good ole days" pens

Signed-In Members Don't See This Ad
See more from Texatdurango

Texatdurango

Member
Joined
Apr 23, 2007
Messages
4,649
Location
Show Low, Arizona
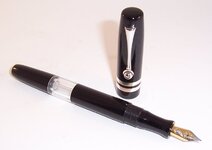
Another of my pens made with the good ole days in mind.

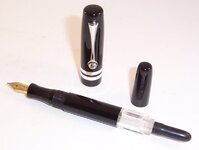
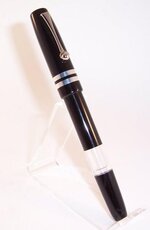
It is called a bulb filler because the pen body itself is the ink resovoir and is filled by dipping the pen in ink and pressing the bulb several times to suck the ink into the pen. The cap sports dual sterling silver accent bands and a ball clip. All parts fabricated by me except nib and clip.

I am just having more fun than is allowed in 23 states! Comments and or suggestions welcome.
 

Attachments

  • bulb1a.jpg
    bulb1a.jpg
    31.8 KB · Views: 355
  • bulb1b.jpg
    bulb1b.jpg
    24.8 KB · Views: 311
  • bulb1c.jpg
    bulb1c.jpg
    13.8 KB · Views: 317
Signed-In Members Don't See This Ad

OKLAHOMAN

Member
Joined
May 17, 2006
Messages
10,228
Location
Costa Rica
George, great execution from a strictly component maker, but I need to know how the other 27 states could be any more fun than that:biggrin:.............ummmm now I remember:biggrin::wink::rolleyes:
 
Last edited:

Rollerbob

Member
Joined
Apr 26, 2009
Messages
1,601
Location
Athens, Texas
George, that is looking mighty fine down toward my way!!:cool: I spect we can get at least enough gas money for that to get us to the next show!!:biggrin:
 

Texatdurango

Member
Joined
Apr 23, 2007
Messages
4,649
Location
Show Low, Arizona
I thought I might add that I put the ink window at the bottom for two reasons. 1. You can hold the pen up to see how much ink is left and 2. you can see how full the pen is getting when filling it.
 

Texatdurango

Member
Joined
Apr 23, 2007
Messages
4,649
Location
Show Low, Arizona
George, that is looking mighty fine down toward my way!!:cool: I spect we can get at least enough gas money for that to get us to the next show!!:biggrin:

Bob, I figure I can sell a few of these at $19.95 to get some quick gas money. I might do some with some solid gold bands and clips, and I figure those might be worth $25 so we'll have plenty of gas money and it's a good thing, I get 10mpg when towing the fifth wheel! Retirement... it's a GOOD thing! :biggrin:
 

Texatdurango

Member
Joined
Apr 23, 2007
Messages
4,649
Location
Show Low, Arizona
It's a real beauty George. Does a button clicker operate the same way as a bulb filler?

No, a button filler relys on a button to depress a pressure bar which in turn compresses the rubber ink sac. Releasing the button allows the pressure bar to return to a relaxed state which in turn allows the sac to return to normal, sucking in ink as it does. The bulb filler uses a tiny "syphon tube" to suck ink into the pen. Several squeezes of the bulb will fill the pen with ink.

Here is a post I made a few months ago showing a button filler.
http://www.penturners.org/forum/showthread.php?t=52615
 

Texatdurango

Member
Joined
Apr 23, 2007
Messages
4,649
Location
Show Low, Arizona
George,
Fantastic looking pen. By the way, we are supposed to be having fun right?

Thanks, Yes, we are supposed to be having fun, actually it's mandatory in my shop! If my sweetie or anyone comes into the shop with their gloomy gus face on, they have to leave... or at least stand in a corner until they can comfortably wear a smile! :biggrin:
 

skiprat

Passed Away Mar 22, 2022
In Memoriam
Joined
Oct 19, 2006
Messages
7,812
Location
In a Skip in Wales
Too cool:biggrin:

I never understood the way a bulb works till you said.:redface: Is that the little syphon tube you can just see inside the window of the first pic?

Is this how it works?; Hold the nib in the ink and squeeze the bulb, this then forces a 'bulbful' of air down the tube and the bubbles escape in the ink bottle. Release the bulb and it sucks a bulbful of ink back up the tube into the pen and just keep repeating till filled?

I don't know why, but I always imagined that you'd squeeze the bulb, then dip it in the ink, release. Then I thought you would have to turn the pen upwards and squeeze some more air out:redface:
 

Texatdurango

Member
Joined
Apr 23, 2007
Messages
4,649
Location
Show Low, Arizona
Too cool:biggrin:

I never understood the way a bulb works till you said.:redface: Is that the little syphon tube you can just see inside the window of the first pic?

Is this how it works?; Hold the nib in the ink and squeeze the bulb, this then forces a 'bulbful' of air down the tube and the bubbles escape in the ink bottle. Release the bulb and it sucks a bulbful of ink back up the tube into the pen and just keep repeating till filled?

I don't know why, but I always imagined that you'd squeeze the bulb, then dip it in the ink, release. Then I thought you would have to turn the pen upwards and squeeze some more air out:redface:

Please go to the head of the class, you have it figured exactly! :) While your thinking cap is on think about how and what you would need to modify in order to supply ink to the nib for writing! Remember, filling is one thing, writing is another!

I have experimented with different lengths and diameters of bulbs and of course the longer the bulb, the larger gulps of air it can displace thus filling the pen quicker but I have selltled on an even shorter bulb than the one shown. I doubt anyone will be in such a hurry that two extra squeezes will be a problem.
 

skiprat

Passed Away Mar 22, 2022
In Memoriam
Joined
Oct 19, 2006
Messages
7,812
Location
In a Skip in Wales
:) While your thinking cap is on think about how and what you would need to modify in order to supply ink to the nib for writing! Remember, filling is one thing, writing is another!

quote]

Ok, I've thunked and thunked and can only come up with a guess...

You have to get air back in to replace the used ink right?
Is there a little non-return flap inside the bulb with a small hole to let air in :confused:

This is another one of those ' Too embarrassed to ask ' questions:redface:

I thought that 'eventually' air would glug back up through the nib, but I guess that would fart ink all over the place:eek:
 

Rollerbob

Member
Joined
Apr 26, 2009
Messages
1,601
Location
Athens, Texas
:) While your thinking cap is on think about how and what you would need to modify in order to supply ink to the nib for writing! Remember, filling is one thing, writing is another!

quote]

Ok, I've thunked and thunked and can only come up with a guess...

You have to get air back in to replace the used ink right?
Is there a little non-return flap inside the bulb with a small hole to let air in :confused:

This is another one of those ' Too embarrassed to ask ' questions:redface:

I thought that 'eventually' air would glug back up through the nib, but I guess that would fart ink all over the place:eek:

What an eloquent way to verbalize it, Skippy!!:biggrin:
 

Phunky_2003

Member
Joined
May 18, 2009
Messages
1,470
Location
Bonham Texas
:) While your thinking cap is on think about how and what you would need to modify in order to supply ink to the nib for writing! Remember, filling is one thing, writing is another!

quote]

Ok, I've thunked and thunked and can only come up with a guess...

You have to get air back in to replace the used ink right?
Is there a little non-return flap inside the bulb with a small hole to let air in :confused:

This is another one of those ' Too embarrassed to ask ' questions:redface:

I thought that 'eventually' air would glug back up through the nib, but I guess that would fart ink all over the place:eek:

roflmao I just fell off my stool I might have hurt something, but at least I didn't fart ink.

James
 

ldb2000

Member
Joined
Sep 11, 2007
Messages
5,381
Location
Laurence Harbor, NJ, USA.
Great looking pen George . I like the ink window in the back like that , I'm working on a button filler with a small ink window at the front section .
When you did your button filler , did you use a breather tube or does the compression of the whole sac pull in enough ink to fill it ?

Skippy , Check out this link http://www.richardspens.com/?page=ref/fillers.htm .
This is just the section on filling systems . Check out the rest of the site , it's awesome
 

Texatdurango

Member
Joined
Apr 23, 2007
Messages
4,649
Location
Show Low, Arizona
Great looking pen George . I like the ink window in the back like that , I'm working on a button filler with a small ink window at the front section .
When you did your button filler , did you use a breather tube or does the compression of the whole sac pull in enough ink to fill it ?

Skippy , Check out this link http://www.richardspens.com/?page=ref/fillers.htm .
This is just the section on filling systems . Check out the rest of the site , it's awesome
With the button filler, the sac compressed then regained it's original size thus sucking in a lot of ink, more than a typical converter for sure.

I am a bit confused, if you are using an ink sac what would be the benefit of a window if the ink is in a sac? Is the sac somehow attached to the main barrel to where the barrel itself is part of the resovoir similar to a vacumatic?

Looks like I'm not the only having fun!
 

ldb2000

Member
Joined
Sep 11, 2007
Messages
5,381
Location
Laurence Harbor, NJ, USA.
With the button filler, the sac compressed then regained it's original size thus sucking in a lot of ink, more than a typical converter for sure.

I am a bit confused, if you are using an ink sac what would be the benefit of a window if the ink is in a sac? Is the sac somehow attached to the main barrel to where the barrel itself is part of the resovoir similar to a vacumatic?

Looks like I'm not the only having fun!

Thanks George , thats what I thought . The ink window really just shows there is still liquid ink in the pen , not how much . Just playing around with different designs . As a side benefit you can see what color ink is in the pen :biggrin:
I took the idea from Parkers 51 style pens . The center coupler connects the nib to the sac and provides threads to attach body and cap in my case . I just made the coupler from clear PR .
 

Texatdurango

Member
Joined
Apr 23, 2007
Messages
4,649
Location
Show Low, Arizona
Great looking pen! I'm surprised that you haven't been asked for a tutorial yet.:wink:

There really isn't a need for a tutorial since the construction is pretty straight forward and one could probably just look at the photos and figure things out. :)

I found a wealth of information by looking at old diagrams and drawings of pens in old advertisements.
 

bitshird

Member
Joined
Aug 27, 2007
Messages
10,236
Location
Adamsville, TN, USA.
George, you are really making some of us less talented turners turn green and purple with envy, other than that minor issue you are doing some great work, actually some fantastic work!!! I love seeing that level of craftsmanship.
 

Texatdurango

Member
Joined
Apr 23, 2007
Messages
4,649
Location
Show Low, Arizona
George, you are really making some of us less talented turners turn green and purple with envy, other than that minor issue you are doing some great work, actually some fantastic work!!! I love seeing that level of craftsmanship.

You know Ken, I'm not discounting the fact that I am an absolutely fantastic and modest pen turner :biggrin: but I don't think it's so much talent as it is practice. You probably have talents with a metal lathe I can only dream of one day obtaining!

I don't see myself any more talented now than I was two years ago but I can see that I do many things a LOT better now because I do these things over and over. What's that old saying... "Practice makes perfect", I think there is a lot of truth in it.
 

MuddyWater

Member
Joined
Dec 20, 2007
Messages
37
Location
Tulsa, Oklahoma, USA.
Great looking pen, as well as many other pens that you have recently posted. I would be curious though to know where you are sourcing your clips from. I am working on making more and more of my own componets and like the looks of this clip.
 
Top Bottom