Another Faux Knife Pen

Signed-In Members Don't See This Ad
See more from JD Combs Sr

JD Combs Sr

Member
Joined
Jan 30, 2010
Messages
767
Location
Owingsville, KY
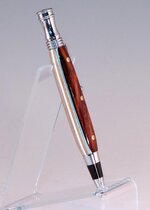
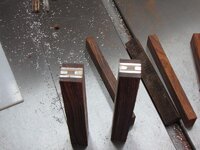
This time the hardware is a WC Chrome Retro. I made the scales from Cocobolo with aluminum and thin maple segments. As in my first one, brass welding rod was used for the rivets.

The Retro is normally a top and bottom barrel pen but the twist mechanism is driven by the finial on top so it was easy to convert it to a long barrel.

I am not real happy with my fit and finish on this one but it will make a nice carry pen. I had lots of trouble with it, similar to what Timothy Wise(AKA "wiset1") had with the one that inspired me. It de-segmented(read blew apart) several times. The epoxy didn't seem to hold like it should. It is either getting old(or maybe I am):rolleyes: or I I suppose I could have mixed it wrong.:redface:

In any case it separated during the drilling process twice then again when I was turning it but even though it fought me all the way it finally became reasonably good looking pen.

Lessons learned:
- Make sure the center "sacrificial material is at least as wide as the brass tube. I designed it for use on a 7mm and ended up using it on a ~10mm.
- Don't mix light and dark wood, the sanding bleeds the dark into the light.
- Only use the design for larger pens. I looks more like a knife handle the larger its circumference.
- Make sure you mix the epoxy correctly ant that it is fresh.
There is probably others but they have left my memory bank.:wink:

Anyway take a look and let me know what your thoughts are. Timothy, I am especially interested in your comments.
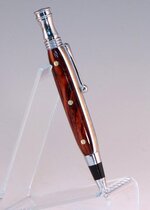
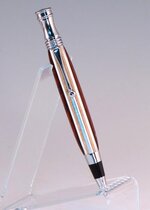
IMG_3875.jpgIMG_3876.jpgIMG_3877.jpg

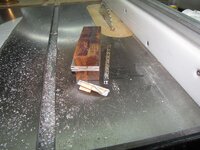
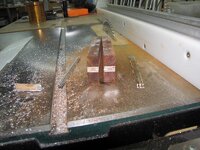
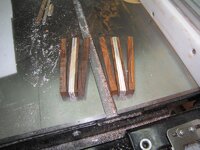
The following pics will give you an idea of the process I used. I used standard 3/4x3/4 pen blanks to make the knife blank. I figured on getting 2 2-barrel pens or 4 singles out of the setup.
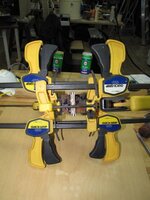
IMG_3861.jpg IMG_3863.jpg IMG_3864.jpg IMG_3865.jpg IMG_3870.jpg

Edit: forgot the finish. 1 coat of thin CA + 10 coats of medium thick. Water wet mm to 12000 then a coat of Renaissance wax(like the feel).
C&C welcomed and appreciated.
 
Last edited:
Signed-In Members Don't See This Ad

Robert111

Member
Joined
Apr 12, 2011
Messages
1,127
Location
Saratoga Springs, NY 12866
Good work! But I'm waiting to hear someone say they found a glue that withstands the segmented pen-making process. So far, I think everyone has had a high percentage of failures when working with metals, not so much other materials.

Anyway, nice design. I like the looks of the one-piece Retro as a pen.
 

SDB777

Member
Joined
Feb 6, 2010
Messages
6,620
Location
Cabot, Arkansas USA
Great idea, and execution!

About how many hours did you have in this one...just wondering?


Nice pen...err, knife....errr, pen.

Scott
 

mhbeauford

Member
Joined
Sep 4, 2011
Messages
167
Location
North Texas
Nice pen! I just finished my first knife concept pen. Yes they are hard to hold together! I used high strength epoxy, sanded and degreased the aluminum with DNA. Turned round between centers to 3/4 in and drilled using my Beall collet chuck, wrapped exposed end with fiberglass strapping tape. Pilot drilled with an 1/8 in drill before using the larger drill. Using the larger drill, I drilled 1/8-1/4 in. at a time, withdrew the bit. if it was too hot to touch comfortably, cooled it with a damp paper towel. When drilling the aluminum it gets very hot and heat softens the epoxy(or CA either) very quickly. (in fact you can "release" a glue joint by heating it, in gem cutting I use boiling water to release the stone from the dop).

In turning I use carbide tools, using very light cuts. Sometimes cutting left or right using the corner of the tool to minimize the shear area of the tool edge to aluminium interface.

I'll post my attempt soon!
 

gbpens

Member
Joined
Jul 1, 2011
Messages
821
Location
Homer Glen, IL
Sharp looking piece. I really appreciate the detailed pictures on the glue up and finishing comments. Thanks for sharing.
 

wiset1

Member
Joined
Aug 25, 2010
Messages
2,222
Location
Florida
I think you've been doing a great job with these pens. I'm glad to see that you're running with my design. I do agree with you though...the larger canvas would be a better reflection of your efforts, and finding a better adhesive is a must!!! My last one is still sitting on my work bench after blowing apart at the glue points. Everyone swears by epoxy, but it popped faster than the ca glue did. Need to find a way to drill prior to glue up and then just insert the tube and turn. Anyways, it's a beautiful pen...time to try a larger platform.
 
Last edited:

JD Combs Sr

Member
Joined
Jan 30, 2010
Messages
767
Location
Owingsville, KY
Neat effect
Thanks Haynie, yes it is neat but I can't claim it. That honor goes to Timothy Wise(AKA "wiset1"), I believe he did it first.:)

Good work! But I'm waiting to hear someone say they found a glue that withstands the segmented pen-making process. So far, I think everyone has had a high percentage of failures when working with metals, not so much other materials. Anyway, nice design. I like the looks of the one-piece Retro as a pen.
Thanks Robert, oh and BTW when you find that better glue be sure to clue me as well...:wink:

Great idea, and execution!
About how many hours did you have in this one...just wondering?
Nice pen...err, knife....errr, pen.
Scott
Thanks Scott, I didn't really track my time but I don't think I went past 2 days on it. That was mainly to make sure the glue was cured.:eek:

Nice pen! I just finished my first knife concept pen. Yes they are hard to hold together! I used high strength epoxy, sanded and degreased the aluminum with DNA. Turned round between centers to 3/4 in and drilled using my Beall collet chuck, wrapped exposed end with fiberglass strapping tape. Pilot drilled with an 1/8 in drill before using the larger drill. Using the larger drill, I drilled 1/8-1/4 in. at a time, withdrew the bit. if it was too hot to touch comfortably, cooled it with a damp paper towel. When drilling the aluminum it gets very hot and heat softens the epoxy(or CA either) very quickly. (in fact you can "release" a glue joint by heating it, in gem cutting I use boiling water to release the stone from the dop).

In turning I use carbide tools, using very light cuts. Sometimes cutting left or right using the corner of the tool to minimize the shear area of the tool edge to aluminium interface. I'll post my attempt soon!
Thanks mhbeauford, can't wait to see yours to compare notes.:)

Sharp looking piece. I really appreciate the detailed pictures on the glue up and finishing comments. Thanks for sharing.
Thanks gbpens, I think the pictures would have been more impressive if the glue up had stayed to gether.:biggrin:

That's a really nice pen. I like how it looks on a longer barrel.
Thanks BSea, I thought it finally turned out OK and I agree I think the longer barrel did help the illusion.

I think you've been doing a great job with these pens. I'm glad to see that you're running with my design. I do agree with you though...the larger canvas would be a better reflection of your efforts, and finding a better adhesive is a must!!! My last one is still sitting on my work bench after blowing apart at the glue points. Everyone swears by epoxy, but it popped faster than the ca glue did. Need to find a way to drill prior to glue up and then just insert the tube and turn. Anyways, it's a beautiful pen...time to try a larger platform.
Thanks Timothy. I appreciate your thoughts the most since it is your basic design. Don't give up on the blown up one, one the things I had to do is go to really light cuts. Would love to see another of yours finished.
 

junosdad

Member
Joined
Aug 8, 2008
Messages
71
Location
La Conner, WA
In putting together segments with a combination of materials [wood/metal/trustone] I had similar experiences when using epoxy.....blew apart repeatedly, likely due to the heat generated during the drilling as previously pointed out.

I've had MUCH better results using generous amounts of thick CA.

Your milage may vary.

Sam
 
Top Bottom