Anodizing efforts continue

Signed-In Members Don't See This Ad
See more from Dalecamino

Dalecamino

Local Chapter Leader
Joined
Jan 2, 2008
Messages
14,572
Location
Indianapolis, In.
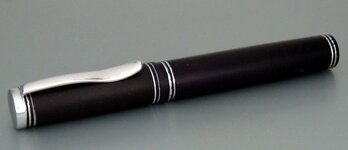
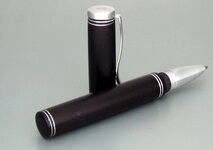
A home made aluminum pen anodized Navy Blue but, it sure looks Purple to me. Thanks to Brad G, this has been a fun project involving help from Mike Redburn and, Marshall Petrik. We found there are quite a bit of "Trial and, Error" points involved in anodizing. But, progress is in the works. Thanks for looking!
 

Attachments

  • IMG_1078.JPG
    IMG_1078.JPG
    31.6 KB · Views: 216
  • IMG_1079.JPG
    IMG_1079.JPG
    30.1 KB · Views: 182
  • IMG_1080.JPG
    IMG_1080.JPG
    50.9 KB · Views: 191
  • IMG_1081.JPG
    IMG_1081.JPG
    49.4 KB · Views: 186
Signed-In Members Don't See This Ad

BradG

Member
Joined
Jul 10, 2011
Messages
1,733
Location
Blackpool -UK
Chuck, great job with this. Seeing as this is your first pen anodised you have done really well. i had lots of failures when i first started. used to drive me a tad nuts until i found my feet :)

Which dye did you use... was this with clothes dye or pro? (see if you can get hold of sanodye there.. i see they have offices in the states. That stuffs brilliant and what i use on all of mine)

Where you have cut the layer away for the banding detail, the lines look a touch rough. is there a burr there? i usually use a 6000 mm grit to just take the burrs off if any... also try not to do this on a mandrel as it will flex giving wobbly lines.
 

Dalecamino

Local Chapter Leader
Joined
Jan 2, 2008
Messages
14,572
Location
Indianapolis, In.
Chuck, great job with this. Seeing as this is your first pen anodised you have done really well. i had lots of failures when i first started. used to drive me a tad nuts until i found my feet :)

Which dye did you use... was this with clothes dye or pro? (see if you can get hold of sanodye there.. i see they have offices in the states. That stuffs brilliant and what i use on all of mine)

Where you have cut the layer away for the banding detail, the lines look a touch rough. is there a burr there? i usually use a 6000 mm grit to just take the burrs off if any... also try not to do this on a mandrel as it will flex giving wobbly lines.
Thanks Brad. I did use Rit clothes dye on this one just for a start. Expensive dyes will come with time. I confess....I used the mandrel for the grooves because I have a FP section on the metal lathe and, didn't want to take it off. The results are just as you described. I don't mind showing these things as, it may be helpful to others. Thanks for pointing these out. And, thanks for the tips. Will be in touch with you.
 

Mapster

Member
Joined
May 21, 2010
Messages
505
Location
Orlando, Florida
Very cool chuck! I like what I see... Now we just need to tweak it here and there until we come up with something truly brilliant! Looks good, great start
 

rej19

Member
Joined
Jul 19, 2008
Messages
821
Location
Indianapolis, IN
Hey Chuck, Just checking to see how you are doing on your space shuttle? I'm sure your working on one of those also.
 

Dalecamino

Local Chapter Leader
Joined
Jan 2, 2008
Messages
14,572
Location
Indianapolis, In.
Very cool chuck! I like what I see... Now we just need to tweak it here and there until we come up with something truly brilliant! Looks good, great start
Thanks Marshall. Designing will be YOUR department :biggrin:

I like the looks of this pen. I really like the two bands at the ends of each barrel.
Thanks Derek. The bands are always better on the metal lathe. You won't see bands like these again :redface:
Hey Chuck, Just checking to see how you are doing on your space shuttle? I'm sure your working on one of those also.
Thanks Ron. I think my mentors Mike Roux and, Mike Redburn may be up to that. :wink: Good to hear from you.
 

Dalecamino

Local Chapter Leader
Joined
Jan 2, 2008
Messages
14,572
Location
Indianapolis, In.
Top Bottom