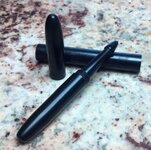
All Black Kitless

Signed-In Members Don't See This Ad
See more from TerryDowning

TerryDowning

Member
Joined
Apr 27, 2011
Messages
520
Location
Newhall, CA
I get 5/8" and 1/2" Urethane rods from work (cast offs as these are gates from large castings.)

Right now I have mostly black. Usually the rods are solid colors. Here is what I have done with some of it.

On top is some left over rod to show what I start with.
The pen is on the bottom.
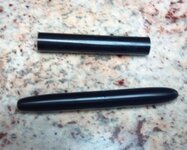
BlackPen1.jpg

This is a really simple design. I am using this as a prototype for different ideas. Closed both ends, section threads (3/8" x 24) into body, clipless cap threads (1/2" x 20) onto body. And of course the refill and spring.
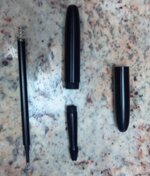
BlackPen2.jpg

All done.
BlackPen3.jpg

If you thought finishing CA over wood or swirly acrylic was tough, try finishing solid materials. There is absolutely nothing to hide the swirls and scratches. I don't have any Micromesh, but I can see I need to invest in some. Wet sanded to 2000, ScratchX2, and some carnuba wax to bring up the shine.

Let me know what you think.

Terry
 
Signed-In Members Don't See This Ad

hewunch

Member
Joined
Aug 5, 2008
Messages
4,660
Location
Albany, GA
Great concept. Here are some thoughts.
1. Your lines are very clean. This is good especially on a black pen.
2. From what I can see, your threads are nice and clean. This is also good.
3. There is a shoulder at the end of your body threads that keep you from over tightening your cap. This is also good.
But
1. The grip/section seems a bit long. Maybe shorten it and lengthen your body.
2. Try to match up the ends of both sides of the pen.
3. There is a shoulder from your grip/section to the body, and it is pronounced. If you can make that wider, it will keep the section from looking so long too.
 

scotian12

Member
Joined
Sep 9, 2007
Messages
985
Location
Halifax, Nova Scotia, Canada.
Terry...The solid black shows every minor scratch. what you are doing is good but to get better you have to go to micro mesh. Follow that with Novus scratch remover or your scratch X. Then to top it off, use one of Barry Gross ( BG Artforms) buffing wheel and blue buffing rouge. I think CSUSA carries it. These steps make a big difference in the gloss of the acrylic and no fine scratches.
 

joefyffe

Passed Away Aug 19, 2018
In Memoriam
Joined
Mar 29, 2010
Messages
1,316
Location
Indianapolis (almost Zionsville) Indiana
Terry: Keep up the endeavor. I don't know how long you have been turning but it looks like you have been around here less than a year. No, this one is not perfect BUT at least you are puting forth the effort that I am just now beginning, (kitless) the effort I have heard a number of "old timers" express fear in even trying. You began a project with scraps and wound up with a usable pen. That in itself deserves a round of applause. Congratulations!!!
 

TerryDowning

Member
Joined
Apr 27, 2011
Messages
520
Location
Newhall, CA
Great concept. Here are some thoughts.
1. Your lines are very clean. This is good especially on a black pen.
2. From what I can see, your threads are nice and clean. This is also good.
3. There is a shoulder at the end of your body threads that keep you from over tightening your cap. This is also good.
But
1. The grip/section seems a bit long. Maybe shorten it and lengthen your body.
2. Try to match up the ends of both sides of the pen.
3. There is a shoulder from your grip/section to the body, and it is pronounced. If you can make that wider, it will keep the section from looking so long too.

hewunch, Thanks for the constructive criticism, I appreciate it. Thanks for the comments on the threading. I made my own die holder (based on George's design) to hold the dies for threading, It made a huge difference. I agree, the section is waay too long and the body is too short. I think the cap is too long as well. I'll definitely correct that in the future. Thanks for the input

Terry...The solid black shows every minor scratch. what you are doing is good but to get better you have to go to micro mesh. Follow that with Novus scratch remover or your scratch X. Then to top it off, use one of Barry Gross ( BG Artforms) buffing wheel and blue buffing rouge. I think CSUSA carries it. These steps make a big difference in the gloss of the acrylic and no fine scratches.

Scotian12, Thanks for the advice and recommendation. I'm going to look into buffing, I just need to get the wheels and compounds. It seems like a less expensive way to go in the long run. I hate spending money on consumables.

Terry: Keep up the endeavor. I don't know how long you have been turning but it looks like you have been around here less than a year. No, this one is not perfect BUT at least you are puting forth the effort that I am just now beginning, (kitless) the effort I have heard a number of "old timers" express fear in even trying. You began a project with scraps and wound up with a usable pen. That in itself deserves a round of applause. Congratulations!!!

joefyffe, Thanks. I've been on IAP about a year. Turning pens about 2 years. Wood working and general turning for most of my life. I first used hand tools when I was 5 or so, I turned my first bowl when I was 13. I do this strictly for a hobby, so I like to use the materials I have on hand. I have a very limited budget and prefer to spend that on tools rather than materials, consumables, and kits. This is why going kitless appeals to me. It is way more satisfying personally.
 

mhbeauford

Member
Joined
Sep 4, 2011
Messages
167
Location
North Texas
Nice pen. I use the Plastics Sanding Kit (CSUSA and others) for sanding my plastic and CA finished pens. I sand to 400 grit (on plastic not CA) and then switch to the Plastics Sanding Kit pads. I just use the last 4 grits and use them wet. Then polish with Meguiar's Plastx, available at auto supply stores. Usually there are no visible swirls in bright light. If there are I buff lightly with White Diamonds on a buffing wheel with the wheel running up and down the pen axis. A touch of Renaissance Wax afterward.
 
Top Bottom