360 Degree Herringbone - First pen post

Signed-In Members Don't See This Ad
See more from WoodenDragon

WoodenDragon

Local Chapter Leader
Joined
Aug 21, 2008
Messages
124
Location
West Bend, WI
This is my first pen post. :redface: Please let me know what you think.

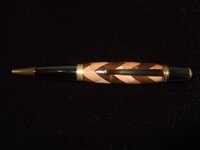
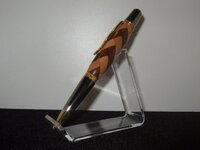
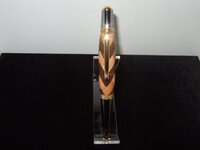
Here's a short story behind the pen...

After seeing Steve (akbar24601) post several variations of the 360 degree herringbone, I decided to give it a try. After all, I had already completed the normal herringbone, how hard could this one be? :confused:

What a %$&*#! nightmare... :eek:

Almost every night I would go down to my workshop and sit at my bench for 20-30mins with little pieces of MDF trying to solve this puzzle. My family started to think I was going nutz! "Why are you sitting there with those little pieces of wood?" they'd say. Most times they would just get an evil glare from me...

After about a week and a half of pure frustration I decided to ask the "Master" for some help. Steve was kind enough to offer me a few clues, without giving away the method, to push me in the right direction. Well after about another week and a half I finally figured it out!!

So after 3 weeks, 100 or so small pieces of MDF, 14 glued fingers, 2 holidays and a New Year, I give you the 360 Degree Herringbone!!!!! :biggrin:


Kit: Wallstreet II - Blk Titanium w/Gold
Material: Walnut and Maple
Finish – CA/BLO


Many thanks to Steve for the hints and NOT giving me the method! Although it was a nightmare at times, it truly was sweet after I worked it out!!

Oh yeah, sorry for the bad photos. I'll learn that once I figure out how to make pens... :wink:
 

Attachments

  • 000033_1.jpg
    000033_1.jpg
    34.2 KB · Views: 533
  • 000033_2.jpg
    000033_2.jpg
    35 KB · Views: 479
  • 000033_3.jpg
    000033_3.jpg
    25.7 KB · Views: 351
Last edited:
Signed-In Members Don't See This Ad

akbar24601

Member
Joined
Nov 4, 2008
Messages
783
Location
Scottsdale, AZ
Mike, that is absolutely BEAUTIFUL!!! I am so proud of you for your persistence, it sure paid off!!! May I offer my opinion...the pen body looks a bit fat. Especially on a Sierra/Wall Street it tends to look better with about 2/3 tapering down to the nib. Food for thought.

BRAVO!!! I love the contrasting wood choice.
 

WoodenDragon

Local Chapter Leader
Joined
Aug 21, 2008
Messages
124
Location
West Bend, WI
Thanks Guys, I appreciate the nice comments! I will probably keep this one as my daily user. Don't know that I could part with it, lol.

akbar24601 said:
May I offer my opinion...the pen body looks a bit fat. Especially on a Sierra/Wall Street it tends to look better with about 2/3 tapering down to the nib. Food for thought.
Of course you can, I value all your opinions. It's helps the learning process. As far as the shape goes, I'm still working out my shaping on all the kits. Plus I was afraid of it blowing up if I went any thinner, lol.
 

talbot

Member
Joined
Mar 12, 2008
Messages
404
Location
Flintshire,UK
Very nice pen Mike!
Your persistence certailnly paid off and I think youre right to keep this one for yourself.
Plus of course you've now mastered the technique so it must become easier as you turn out more.
The pen is a just a wee bit fat for me but its lovely nevertheless.
Regards, Bill
 

TribalRR

Member
Joined
Jun 2, 2008
Messages
170
Location
Louisville, Kentucky
Congrats Mike! Thats a nice looking pen!

You might try thiner pieces on your next one, it helps with flaring effect of the corners.

Also, all wood blanks like this don't blow up... often. You really have to try to have them come apart!
 
Last edited:

ed4copies

Local Chapter Manager
Joined
Mar 25, 2005
Messages
24,528
Location
Racine, WI, USA.
Good one, Mike!!!

The color selection is GREAT, joints look fab, mechanically, it is a work of art!!!!

Artistically, you should change the slope. I can identify with worrying about it blowing up, I did several Eagle blanks where I felt that concern. As he used to say, "You always KNOW you should stop and apply thin CA about ten seconds too late!" So, an ounce of prevention!! As you get to the finished size, drench your pen in thin CA. Sometimes you want to take the bushings off as you near final size, so they don't get permanently glued to the blank. IF you DO glue them on, a quick pass with a sharp skew or parting tool will take them off, cleanly. Learn to LOVE your thin CA. Stop FREQUENTL"Y.

For me, this meant two nights of turning. As I neared final size, I would douse the blank one last time and retire for the night (at least retire from THAT pen). FIRST thing the next night, while I am fresh, FINAL turn. Still using CA, but now, mostly, with sandpaper for the "pretty" part - the "work" was finished yesterday.

Good luck, you have a GREAT start. Now, go make expensive pens!!!!
 

LabTrnr

Member
Joined
Oct 15, 2007
Messages
77
Location
Durham, NC
Looks good! I expect to see that one in person Sunday. The herringbone design is one that I've been contemplating trying myself.
 

WoodenDragon

Local Chapter Leader
Joined
Aug 21, 2008
Messages
124
Location
West Bend, WI
Once Again, Thanks for all the compliments and tips! They are all greatly appreciated!!

I don't know about anyone else, but for me I think the hardest part in turning is determining the final shape. Making the shape isn't that hard, unless of course you are worried the chosen shape may cause a blow-up!:redface:

Some people like the bushing-to-bushing look, others like the big bulge, yet some like a slight bulge or slope, then you can get into the beads and coves and what not. Then everything always varies by the particular kit. Do you make the pen to "your" style, to what you "think" the customers would like, the "general consensus", or a little bit of them all?

I haven't been turning long enough to have a "style", and I haven't seen enough pens up close to see how and what others do.

So what truly dictates the shape, the blank, the kit, the turner, the customer, or does none of it matter and it is what it is?

Inquiring minds want to know!! (mainly just me... :rolleyes:)
 

akbar24601

Member
Joined
Nov 4, 2008
Messages
783
Location
Scottsdale, AZ
Hey Mike, I think that is a very valid question indeed!!! For starts, I would say that you as the artist are going to develope what suits you and your tastes. That having been said though, I think that alot of it will come from experience and customer feedback. What do the masses like (if we are ever lucky enough to get that much feedback!). But, like I said, we are all artists and there is nothing wrong with putting some of who we are into our pieces. Of course, if they never sell, then maybe that needs to be reevaluated!!!
 

VisExp

Member
Joined
Oct 1, 2007
Messages
2,738
Location
Palm Coast, FL, USA.
Mike, the pen looks great. Congratulations on figuring out how to build it, you're way ahead of me. The whole process, both the journey and the destination, must have been very satisfying.
 

Freethinker

Member
Joined
Jun 26, 2007
Messages
275
Location
MO.
Terrific looking pen, but since I cannot quite figure out how the 360 herringbone is achieved I have a question for you fellas....

....why is it that no one seems willing to share the details on the technique for making these 360 degree herringbone pens?

Is it some sort of state secret???...........just asking.

I thought one of the commonplace principles of the penturning community in general --and of this message board-- is that penturners would willingly share their methods of work and their concepts and ideas with one another freely.

Like I said, no hard feelings. Just asking.
 

ldb2000

Member
Joined
Sep 11, 2007
Messages
5,381
Location
Laurence Harbor, NJ, USA.
Dan , it's not a state secret or anything , and these people are some of the MOST sharing people I have ever had the honor to know . I don't know if you have ever heard of a gentleman here called Eagle , his outlook on sharing information was that , you give help , but that more is learned by doing then tutorials . By figuring it out for your self you grow as a penmaker and not just copy someone else's work . If your interested in how to make them PM Steve and I'm quite sure he will be more then willing to point you in the right direction .
 

Rmartin

Member
Joined
Jan 14, 2007
Messages
1,263
Location
Columbus, Ga, USA.
Very nice. Unfortunately, from the photos it's difficult to tell where some of the pieces meet. I love making herringbone pens, but not sure I have the time to discover the 360 state secret right now.
 

PaulDoug

Member
Joined
Mar 2, 2008
Messages
3,488
Location
Benton City, WA.
Well if I ever learn how to do it I'm going to tell all! But, I said if I ever learn. Don't anyone hold their breath!

Nice pen!
 

wickford

Member
Joined
Jan 15, 2008
Messages
160
Location
Canton, Ohio, USA.
It seems for some reason that the ever elusive 360 herringbone is quite sought after...It is very difficult to figure out (IMO) but I've heard that once you do, the satisfaction far outweighs the frustrating journey. I've talked to Tribal a couple times and he's been more than willing to give me tips and point me in the right direction which is great! I think as a previous post said in regards to Eagle, that its much more valuable if you figure out the method on your own..

By the way, I've not figured out yet...Still working on it, but I so far only have a few hours into it...Can't wait till I can post my first picture of a completed 360 HB...

Good Luck!
 
Top Bottom