30 Pieces of Silver

Signed-In Members Don't See This Ad
See more from leehljp

leehljp

Member Liaison
Joined
Feb 6, 2005
Messages
9,314
Location
Tunica, Mississippi,
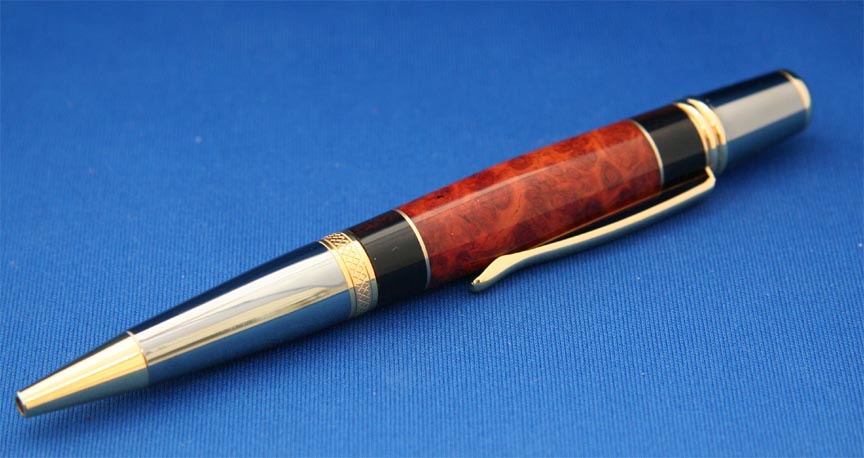
Elegant Beauty TI Gold with Bloodwood, BOW and Holly. 30 Silver spots at the top are from core solder as representative of the silver. .5mm brass as separators between layers of wood. Named from a Biblical passage, and made for two national (Japanese) workers in ministry.

I looked for some new silver core in store locally but couldn't find high silver content that I wanted, so I used a combination solder that I had on hand - and in which I was unsure of as the the amount of sliver. I measured the core solder and drilled holes from a HF numbered bit that matched the solder diameter. Correction - the solder I used - about 10 % silver the rest is tin. Also the core is rosin, not acid. AS another add in for those who might not be aware of it - the solder dots are intentionally randomly placed instead of orderly, representing the throwing of the coins on the ground.

Problem and unusual fix: The solder caused unusual smearing of dust, dulling the bloodwood considerably. I cranked up the lathe to around 3600 RPM, and used a very very very sharp squared end scraper (of my own making) with a very light touch - and it smoothed the whole pen as though it were sanded way beyond 400 / 600 sandpaper. No sanding done to the wood of this pen - I was very surprised at the ability to smooth so well without SP.

Finished with 3 applications of medium CA. I did sand the CA smooth - through 12000 MM.


1_30_Pieces_of_Silver.jpg
 
Last edited:
Signed-In Members Don't See This Ad

jttheclockman

Member
Joined
Feb 22, 2005
Messages
19,082
Location
NJ, USA.
Very classy pen. That is a perfect choice of kit for your work. Thanks for thinking outside the box. Job well done.
 

avbill

Member
Joined
Oct 18, 2007
Messages
1,973
Location
San Bruno, CA, USA.
There are several consistent turners on IAP that produce absolutely beautiful pens and your one of those turners Hank.

The pen is well designed as the end of the clip is just short of the end of the BOW. The three segments of Blood wood continue the balance of the blank. THe holly off sets the blank from the silver spots. Hank continues the design with brass segments that match the gold tone of the pen kit. The design is busy yet well balanced and pleasing to the eye. Hanks selection of Gold and Black titanium finishes this pen with an elegant touch.


To the power to bees of the IAP Maybe there should be a Hall of Fame where a judges panel critics a pen and the Best of the Best are there. Where there is a description from the makers as how he/she made it and a description from the panel as to why it made the hall of fame.

This pen should be in it!!
 

leehljp

Member Liaison
Joined
Feb 6, 2005
Messages
9,314
Location
Tunica, Mississippi,
WOW! Thanks guys, for all of your the compliments! I appreciate it very much.

Bill, I do think it is a little too busy looking too, but I had to give it a try and was surprised at the balance. I had two different band sizes of red and white and had to choose which ones to use. I felt the ones used gave the right balance, but even that was a guess before turning. I was aiming at the clip to end on the BOW with a small space before the bloodwood. I honestly did not expect it to come out as nice as it did, so I can't take credit for "seeing" it beforehand. Luck of the draw.

Thanks again for your kind words everyone!
 

BRobbins629

Passed Away Dec 28, 2021
In Memoriam
Joined
Mar 8, 2006
Messages
4,037
Location
Richmond, VA, USA.
Very lovely as all have said. Just one curiosity - there appears to be a small dimple in the silver inlays. Intentional?
 

leehljp

Member Liaison
Joined
Feb 6, 2005
Messages
9,314
Location
Tunica, Mississippi,
Very lovely as all have said. Just one curiosity - there appears to be a small dimple in the silver inlays. Intentional?

The silver inlays were made from solder wire. Some solder have a core of acid or other material (flux) to assist the solder in melting, cleaning and sticking. The core of such solder in many of these cases is hollow, and filled with the acid or other material. That is what you see as a dimple.

Some countries and some old world coins have a hole in the middle. Not sure about the 30 original silver coins, but they did look nice on the first pen, so I did that for the second one too.
 

Daniel

Member
Joined
Jan 1, 2004
Messages
5,921
Location
Reno, NV, USA.
Very nice. you have a lot of elements there for them to work together as well as they do. the design in the center band actually takes away from what you have done. it would be nice if there was just a simple smooth gold center band for this pen. pretty good work when you can outdo the pen designers.
 

leehljp

Member Liaison
Joined
Feb 6, 2005
Messages
9,314
Location
Tunica, Mississippi,
Love it....

Can you tell me more how you segmented with the brass? Where did you get it? How did you glue it? At what point did you drill your holes for the "silver"?

Brass:
I buy brass sheets in .3 mm (I think that is the size), .5 mm and 1 mm over here. I usually buy 4 inch by 12 inch sheets. For my segments, I took 2 pieces of 1/2 inch thick plywood 6 inches by about 14 inches and placed the brass between the 2 pieces of ply, and screwed it together around the edges. Next I drilled holes at intervals with the size of pen tubes I wanted to have segments. Unscrew the boards, and with a heavy duty hand metal cutters (heavy duty scissors) I cut a rough circle around the holes. If any are not flat, I place them between two boards and hit with a hammer a couple of times.

The brass 'rings' do not have to be symmetrical. I do sharpen my chisels well and take small light patient bites. It is an exercise in patience but each ring will arrive at its correct size in fine shape - with patience. I guess I took about 3 to 5 minutes per ring in turning it down on the pen. They started off as about 3/4 inch in outer diameter.

I use two methods in using brass segments:
1. I place the center piece on the tube and glue it. Turn it and square up the ends while turning; remove the blank and add brass rings to both ends, and then end pieces and glue with epoxy (for set up time). The two end pieces overhang the end of the tubes and I clamp them with hand clamps. Remove after glue hardens and trim ends, then turn to finish.
Example: http://www.penturners.org/photos/images/940/1_Best_pen.jpg

2. On the pen at the beginning of this thread, I glued the top end on first with 5 min epoxy. It was already cut to the proper length and I made sure it was flush with the end of the tube. After it set up for about an hour, I added the rest of the pieces with 5 minute epoxy. The last piece was about 1/32 inch longer than the end of the tube. I place a hand clamp on the blank and tightened. After about 30 minutes, I released the clamps and trimmed the ends by sanding. A clue here - with segments of small pieces, a barrel trimmer can catch and destroy a blank quick. Therefore I use a sander to square up the ends on delicate blanks. Then turn the blanks.

Silver:
I turned the blank down until it was about 1 mm larger than finished size and drilled the holes to the brass tube. I used mini needle nose pliers to pick up each piece and place them in. I tapped each one lightly with the pliers after placing them, then CA the solder before turning.
 
Last edited:

leehljp

Member Liaison
Joined
Feb 6, 2005
Messages
9,314
Location
Tunica, Mississippi,
Very nice. you have a lot of elements there for them to work together as well as they do. the design in the center band actually takes away from what you have done. it would be nice if there was just a simple smooth gold center band for this pen. pretty good work when you can outdo the pen designers.

Daniel,

I have to agree with you. I think they would look better with plain bands, if I could find them, or even the lesser designed bands of the standard TI gold Sierras.
 
Signed-In Members Don't See This Ad
Top Bottom