3 more pens from NH Scotts Blanks.

Signed-In Members Don't See This Ad
See more from mikespenturningz

Joined
Feb 24, 2012
Messages
4,368
Location
Claremont NH
Well I finally got around to turning up some of the blanks that I got from Scott. I put them on 3 Triton pen kits that I got from Ed at ExoticBlanks.

il_570xN.331039992.jpg


il_570xN.330902259.jpg


il_570xN.330900779.jpg


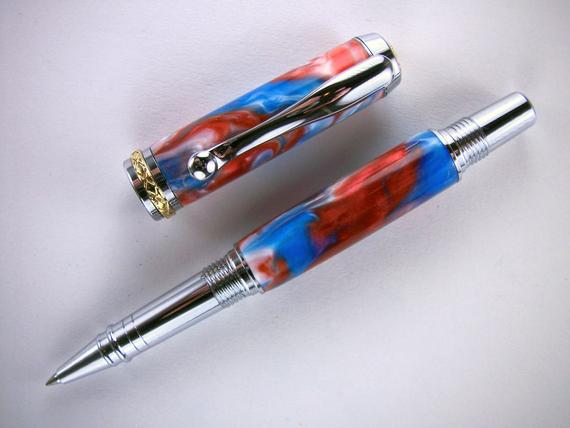
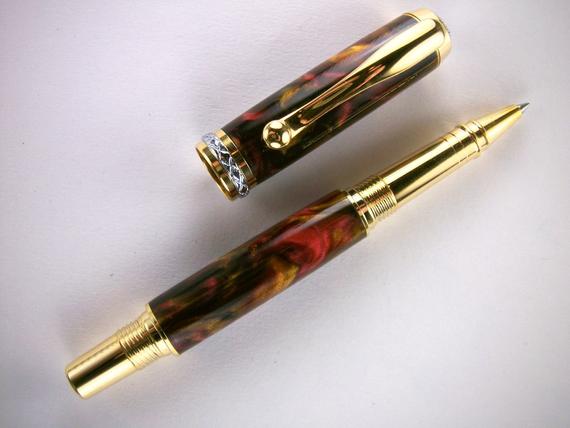
I think these may be the prettiest pens I have made to date. I finally figured out that the ends of the main barrel are different sizes and I have these put together correctly.

If you want to see more images you can look on my Etsy Site.

Thanks for looking.
 
Signed-In Members Don't See This Ad
Joined
Feb 24, 2012
Messages
4,368
Location
Claremont NH
Is it just the photo, or is the 1st overturned at the body finial?

It is just slightly overturned but actually not. The blank tore out and I had no choice but to take it down to get rid of the tare. I finished taking out the tare using my sanding bushings. I was lucky it happened on the larger end. I should have used a smaller fitting from another kit to cover it up! Oh well. It is like many things in life we are always going to stumble but the important thing is how do we recover! :doctor:
 

chriselle

Member
Joined
Sep 1, 2008
Messages
1,251
Location
Ito City, Shizuoka, Japan
Mike, they look good but....and this may be a conscious decision on your part....you may want to re-read the assembly instructions for this particular kit. Again, apologies if that was a design feature on your part.
 
Joined
Feb 24, 2012
Messages
4,368
Location
Claremont NH
Mike, they look good but....and this may be a conscious decision on your part....you may want to re-read the assembly instructions for this particular kit. Again, apologies if that was a design feature on your part.

Where is the error in construction? I can make mistakes but I didn't think I did on these?

Mike
 

BSea

Member
Joined
Dec 28, 2009
Messages
4,628
Location
Little Rock, Arkansas
Mike, they look good but....and this may be a conscious decision on your part....you may want to re-read the assembly instructions for this particular kit. Again, apologies if that was a design feature on your part.

Where is the error in construction? I can make mistakes but I didn't think I did on these?

Mike
I agree, You explained the 1st one. The other 2 look perfect to me.
 
Joined
Feb 24, 2012
Messages
4,368
Location
Claremont NH
Mike, they look good but....and this may be a conscious decision on your part....you may want to re-read the assembly instructions for this particular kit. Again, apologies if that was a design feature on your part.

Where is the error in construction? I can make mistakes but I didn't think I did on these?

Mike
I agree, You explained the 1st one. The other 2 look perfect to me.

BSea are you the maker of these blanks that I got from Scott? I really love these blanks. You will see more of them made in the coming days.
 

triw51

Member
Joined
Feb 14, 2012
Messages
2,062
Location
407 East Cottonwood Drive, Cottonwood AZ
Is it just the photo, or is the 1st overturned at the body finial?

It is just slightly overturned but actually not. The blank tore out and I had no choice but to take it down to get rid of the tare. I finished taking out the tare using my sanding bushings. I was lucky it happened on the larger end. I should have used a smaller fitting from another kit to cover it up! Oh well. It is like many things in life we are always going to stumble but the important thing is how do we recover! :doctor:

I totally agree with your statment "It is like many things in life we are always going to stumble but the important thing is how do we recover!"

Thank you for sharing your difficulties that gives up newbies hope...
 

chriselle

Member
Joined
Sep 1, 2008
Messages
1,251
Location
Ito City, Shizuoka, Japan
The end cap is (usually:wink:) the tapered end. If lining up the pattern on the blanks isn't an issue then it's easy enough to just switch the front section with the end cap. But, hey if you like them this way round..cool.
 
Joined
Feb 24, 2012
Messages
4,368
Location
Claremont NH
The end cap is (usually:wink:) the tapered end. If lining up the pattern on the blanks isn't an issue then it's easy enough to just switch the front section with the end cap. But, hey if you like them this way round..cool.

I have to admit I have never read the instructions for this pen. I assumed the narrow end would fit better under the cap. I have not tried it the other way. I will try it next time I make one. Thanks for the tip.
 

BSea

Member
Joined
Dec 28, 2009
Messages
4,628
Location
Little Rock, Arkansas
The end cap is (usually:wink:) the tapered end. If lining up the pattern on the blanks isn't an issue then it's easy enough to just switch the front section with the end cap. But, hey if you like them this way round..cool.
Oh, I see it now. You're right. It shouldn't be an issue though. There is so much variance in the curve of the blank when turning, it could easily be by design. I did the same thing on my 1st pen of this style. I didn't notice until it was too late.
 
Top Bottom