3 form this evening

Signed-In Members Don't See This Ad
See more from Rick P

Rick P

Member
Joined
Apr 30, 2011
Messages
1,686
Location
Palmer Alaska
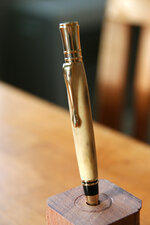
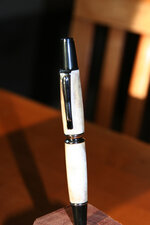
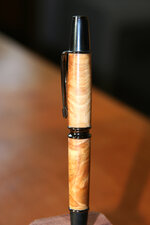
Turned these three this evening, and executive in moose antler. A patrizio in Caribou antler and a Patrizio in birch burl. The burl came from root stock the road crew had dozered to the side, I stabilized it myself and this was my first try at a CA finish. Would one of you tell me exactly how you go about CA finishes please? I glued the brush to the barrel on my first coat so I switched to using my finger.......glued myself to the workbench at one point. I will say this CA is hard and really brings out the luster of the wood! Any suggestions on photographing antler? The pics are awful! Especially the caribou has far more color and variation than shows up, I did what I could in photo shop but........


It was really nice to turn wood again!
 

Attachments

  • Resize Wizard-1.jpg
    Resize Wizard-1.jpg
    112.5 KB · Views: 200
  • Resize Wizard-3.jpg
    Resize Wizard-3.jpg
    91.1 KB · Views: 201
  • Resize Wizard-2.jpg
    Resize Wizard-2.jpg
    97.5 KB · Views: 185
Last edited:
Signed-In Members Don't See This Ad

Fibonacci

Member
Joined
Feb 9, 2011
Messages
823
Location
Ridgecrest, CA
Those look sharp. I will have to try the patrizio.

There is an article in the library on doing a CA finish that is pretty good.
 
Joined
May 24, 2010
Messages
13
Location
San Jose, CA
For a CA finish, I sand to about 800 grit and wipe the sawdust off. I cut a paper towel in half, and fold it in half, and then half again so that it's 1/4 width and 4x thick. I then apply a thin stripe of medium CA glue lengthwise along the barrel, with the lathe turned off. Then I rotate the lathe by hand and wipe the CA glue evenly with the paper towel. Work fast, and the towel won't stick. Thin coats are best, and I usually apply a lot (about 8-10). Be sure to let each coat dry (5-10 minutes on a warm day). After I apply the coats of CA, I resume sanding, this time wet sanding, with either 800 or 1200 grit, depending on how much I've built up the CA. The 800 grit evens out the rough spots a little more efficiently, but runs a higher risk of sanding through the CA. If you sand through the CA, most woods will just take more coats, but the more porous woods, like oak, will most likely be ruined if the water seeps into the wood. After I smooth the CA with the 800 or 1200 grit, I just wet sand with micro mesh through 12000 on the fastest RPM I have. You can then apply a scratch removing compound (I use one that is made by Meguiars) that will clean everything up nicely. This is just my way of doing it, others do it differently, which you can find in the library or under pen turning techniques sections.
 

firewhatfire

Member
Joined
Mar 7, 2011
Messages
3,813
Location
Columbiana, Alabama
When I do my CA I use a paper towel as well but I also take a post-it note and fold in half to put under my papertowel. That keeps that pesky glue from sticking me to a papertowel. I think next time I and going to try a piece of wax paper under my papertowel as the glue doesn't stick to it either.

I like the burl, but hate the smell of horn turning.

Phil
 

Rick P

Member
Joined
Apr 30, 2011
Messages
1,686
Location
Palmer Alaska
So I read both articles and I really appreciate your response but what keeps the barrel from sticking to the bushings? I took the barrels off, applied a coat, sanded on the lathe and repeated.......several times. Got stuck to all kinds of stuff, saw dust, myself the bench etc.......Thanks again for your help guys!
 

Rick P

Member
Joined
Apr 30, 2011
Messages
1,686
Location
Palmer Alaska
LOL my, for lack of a better word, angle has been "Alaskan" materials so most of my turning is horn, bone, ivory or antler. I have been able to find some really cool wood but I am fairly limited to birch, alder and spruce........I do buy and work other woods but like I say most of it is "Alaskan" stuff. You get used to the smell and I dont turn without a respirator. I was surprised to find that even mammoth bone smells like burnt hair!
 
Joined
May 24, 2010
Messages
13
Location
San Jose, CA
It's inevitable that the bushings will glue to the tubes. What I do is one of two things; I either "part" it off with a parting tool at a high speed and a light touch with about 1/16" of glue overlap from the bushing to the tube, or I take the tubes, glued to the bushings, off the lathe and take an Exacto knife or a razor blade and cut through the CA glue to the bushing, again with about 1/16" overlap of glue from the tube onto the bushing. (Of the two methods, I've had better luck with the razor blade method.) I then grab the bushing with some pliers and pull it out of the tube. With the glue that hangs over the tube, I very carefully take a razor blade and cut the "flash" off the tube. You'll get the hang of it. It took me a few pens, but I've got it down pretty well to this point.
 

bensoelberg

Member
Joined
Aug 19, 2010
Messages
782
Location
Bakersfield, California
So I read both articles and I really appreciate your response but what keeps the barrel from sticking to the bushings? I took the barrels off, applied a coat, sanded on the lathe and repeated.......several times. Got stuck to all kinds of stuff, saw dust, myself the bench etc.......Thanks again for your help guys!

The most common solution to this is waxing the bushings. Buy a can of Kiwi Neutral shoe polish, and rub some on the bushings where they will come in contact with the blank. By doing that, you will be able to pull the blank and the bushings apart without cutting them or risking that the CA will chip off. Another solution is to turn your own finishing bushings out of something like corian or delrin. (Delrin is better because CA doesn't stick to it, corian is easier to find, but will require you to wax it like above.) If you choose to do this, I would recommend turning 3 bushings. Two cone shaped for the headstock and tailstock ends and one diamond shaped that will sit between the two blanks. Look at the section about finishing in this tutorial by Texatdurango - http://content.penturners.org/library/techniques/turningbetweencenters.pdf - although he is using doing it between centers, you should get the idea and see the advantage to cone shaped finishing bushings fairly easily. If you have any other questions, feel free to send me a PM.
 

G1Pens

Member
Joined
Oct 4, 2010
Messages
1,859
Location
Atlanta, GA area (Dacula)
Three very nice pens. Pictures are pretty good overall. The only thing you might do is go to a solid neutral colored background...black, white....greay...tan....this helps the details of the pen stand out. On something like antler do a few close ups it you can. Also, there is nothing wrong with going to something like photoshop to enhance the shot. Sometimes you just need to do that to bring out colors and add some contrast or brightness.
 

BSea

Member
Joined
Dec 28, 2009
Messages
4,628
Location
Little Rock, Arkansas
So I read both articles and I really appreciate your response but what keeps the barrel from sticking to the bushings?
There is always the option of turning between centers to finish. You can buy delrin bushings for many kits from JohnnyCNC. And for kits that you can't get delrin bushing, just go direct to the brass tube. You will have to clean off the live & dead centers doing this, but that's not a big deal. This sure seems easier to me than having to use an exacto knife or a skew to part the bushings from the blank. The only draw back is that you can't do both sections at the same time.

In my vast pen experience (over 20 pens now :wink:), turning & finishing between centers is the only method I've used. And I've never had delrin bushing stick, or a blank stick to any of my centers.

Look at turning between centers in the library.
 
Last edited:

TerryDowning

Member
Joined
Apr 27, 2011
Messages
520
Location
Newhall, CA
Paper towel here too folded in quarters. 4 - 5 drops with the lathe at a medium speed.

Work quick! and be patient between coats.

To avoid the bushing stick thing. I changed up a bit. I made a second mandrel from a length of 1/4-20 threaded rod. I just put it in my drill chuck. After turning, I transfer the blanks to my finishing mandrel. I use some older slimline bushings to hold everything in place with a bit of paste wax on the bushings prior to applying CA. I've been turning a lot of euros lately and the slimline bushings have a lower profile. I may try some bits of brass tubing as well. You just have to keep the pen turning. If I do get the bushing stuck on the blank I use a razor blade to score the CA while turning the spindle by hand, that separates the two nicely.
 

Rick P

Member
Joined
Apr 30, 2011
Messages
1,686
Location
Palmer Alaska
Rick, I have a set of Caribou antlers I'm going to turn and was woundering if they are good and solid in the middle?
Gary

Gary

Like any bone they have a spongiform matrix in the center, the walls of antler are thicker and the smaller diameter antler will be solid but the main part of the antler will have the matrix. The most color and variation is found where the antler branches, alot like a tree. I use the more lumpy bumpy and branched piece's for my higher end pens and the long strait stuff for less expensive kits. The long strait stuff is easier to turn. Personally I dont sweat a bit of exposed matrix I think it adds "character" and so far my customers agree.
 

Rick P

Member
Joined
Apr 30, 2011
Messages
1,686
Location
Palmer Alaska
Thanks everyone for your help! It is arpeciated.........I have an idea I am going to try, I'll psot pics if its not a complete failure.
 
Top Bottom