2nd Yankee Blank

Signed-In Members Don't See This Ad
See more from maxman400

maxman400

Member
Joined
May 25, 2009
Messages
3,111
Location
Omaha Arkansas
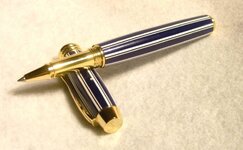
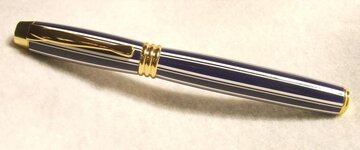
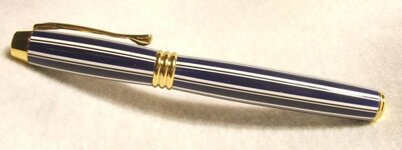
This is a copy of the Yankee inspired blank that I made for John, This was also to see if I could duplicate it :confused: and to work on the size of it. It is on an executive kit from CSUSA, this one goes to my Boss he is a huge Yankee's fan. :biggrin:
Thanks for Looking, any comments are welcome and appreciated.
 

Attachments

  • New Yankee 028 (7).jpg
    New Yankee 028 (7).jpg
    48.5 KB · Views: 159
  • New Yankee 028 (9).jpg
    New Yankee 028 (9).jpg
    31.2 KB · Views: 113
  • New Yankees 013.jpg
    New Yankees 013.jpg
    30.7 KB · Views: 125
  • New Yankees 013 (11).jpg
    New Yankees 013 (11).jpg
    27.9 KB · Views: 117
Signed-In Members Don't See This Ad

jttheclockman

Member
Joined
Feb 22, 2005
Messages
19,148
Location
NJ, USA.
Max , once again that is fantastic. Did you have any problems lining up the stripes on this type pen and can you give us a hint how you went about that??? Looks spot on. Excellent work. Thanks for showing.
 

maxman400

Member
Joined
May 25, 2009
Messages
3,111
Location
Omaha Arkansas
Max , once again that is fantastic. Did you have any problems lining up the stripes on this type pen and can you give us a hint how you went about that??? Looks spot on. Excellent work. Thanks for showing.
After removing it from the mold I turned it between centers, down to 3/4" then I cut it to size and used my lathe to drill it. After drilling I turned it between centers again down to size. Before turning I lined up the stripes and marked one of them in the inside of the tube on both tubes, this helped me make sure that I got the right stripes lined back up during assembly. I like this kit because the cap only lines up one way, so I assembled the bottom half of the Pen then screwed on the center band and then lined up the stripes on the cap. Completed assembly as normal.
 

jttheclockman

Member
Joined
Feb 22, 2005
Messages
19,148
Location
NJ, USA.
After removing it from the mold I turned it between centers, down to 3/4" then I cut it to size and used my lathe to drill it. After drilling I turned it between centers again down to size. Before turning I lined up the stripes and marked one of them in the inside of the tube on both tubes, this helped me make sure that I got the right stripes lined back up during assembly. I like this kit because the cap only lines up one way, so I assembled the bottom half of the Pen then screwed on the center band and then lined up the stripes on the cap. Completed assembly as normal.


Once again excellent work. Thanks for the info and I may just have to try some of these kits. Just for things like this. Thanks again.
 
Top Bottom