1st photo post - Pen for a buddy (W/ Woodchuck Bowl Pro)

Signed-In Members Don't See This Ad
See more from judgesawdust

judgesawdust

Member
Joined
Oct 20, 2009
Messages
38
Location
California
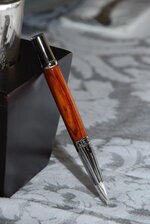
I started and finished this pen last night. Cocobolo purchased from a fellow on SawMillCreek. Finish is CA followed with HUT Ultra Gloss plastic polish.

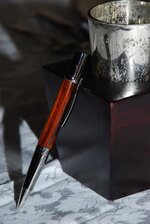
The pen kit is the Sierra Elegant Beauty platinum/black titanium from Berea.

Finally, the blank was turned with my brand-new Woodchuck Bowl Pro from Bitshird here on this forum . . . THANKS AGAIN KEN!

Thanks for looking.

Critiques - good and improvement needed - are always welcomed and encouraged :biggrin::eek:

jeff
 

Attachments

  • 2010 Aug 01_Pen for Ray_0007.jpg
    2010 Aug 01_Pen for Ray_0007.jpg
    28.2 KB · Views: 271
  • 2010 Aug 01_Pen for Ray_0009.jpg
    2010 Aug 01_Pen for Ray_0009.jpg
    29.9 KB · Views: 201
Signed-In Members Don't See This Ad

ToddMR

Member
Joined
May 3, 2010
Messages
1,715
Location
Columbus, OH
Very nice pen, and its super shinny on the kit on the first picture. The size and finish both look great. Good job!
 

judgesawdust

Member
Joined
Oct 20, 2009
Messages
38
Location
California
Thanks

Thank you for the compliments and the photo critique. Since I don't sell pens, I don't have the fancy pen holders, lighting tent and other paraphernalia that would probably make for better photos.

I do have a Nikon D80 w/ SB600 flash, so not too shabby in the camera set-up.

Any suggestions for taking better shots with what I've got?

Thanks again.
 

Craftdiggity

Member
Joined
Mar 10, 2010
Messages
1,373
Location
Egg Harbor Township, NJ
Nice pen. Just a plain background would look good. Some guys use a stand and others lean the pen on a single item like deer antler or a pen blank. The idea is to keep the focus on the pen and not distract with a busy background.
 

Hucifer

Member
Joined
May 30, 2009
Messages
106
Location
Asheboro, NC
I made a tent with a cardboard box with the sides and top cut out and printer paper covering the cutouts. I then used desk lamps behind the paper to light the box. simple, and free. I bought a book of plain 11x17 construction paper at Michaels( in different colors), and use different colors based on the pen for a background. I have some poker chips I use for a stand sometimes, and I use a tiny bit of wax to hold the pen from slipping. I also have a piece of coat hangar that I made a stand out of that I place under the paper poking out that I slide the tip of the pen over(I take out the refill first) so it looks like it is standing by itself...

The most I spent was on the paper at Michaels... well I guess I spent a bunch on getting the poker chips from the casino's in Vegas... ;-)

Oh, and very nice pen... I used those for my daughters wedding as gifts for the bridesmaids... love that kit.
 

judgesawdust

Member
Joined
Oct 20, 2009
Messages
38
Location
California
Thanks a bunch

Hugh,

First off, thanks for the compliment on the pen. I like how it turned out as well (not always the case:eek:).

Second, thanks a ton for the cheapo lightbox idea. That is great advice and right up my alley. Since I don't (and don't plan to) sell any pens, I really didn't want to put any money into the photo side of things.

Yours was a great help. I'm going to do that next time I photo.

As to the colored paper . . . that sits against the back cardboard wall, or on the bottom with the pen on top?

Jeff
 
Top Bottom